2026 is the Year of the Fire Horse
Have some fun making Lunar New Year Fire Horse Marionnettes.
Lunar New Year, which has been celebrated for over 3,000 years, begins Feb. 17 and ends with a Lantern Festival on March 3. It’s a special year because while each Lunar New Year animal is represented in a 12-year cycle, the fire horse specifically only takes place every 60 years (the last fire horse year was in 1966). There are five elements in the Chinese Zodiac: Wood, Fire, Earth, Metal and Water. Each animal is paired with each element, creating a 60-year cycle. Many families throughout the Asian diaspora celebrate Lunar New Year, which is also known as Chinese New Year (or Spring Festival) in China, Têt in Vietnam, Seollal in Korea and Losar in Tibet, to name a few. The celebration often includes lion dances, exchanging red envelopes, time with family and visiting temple.
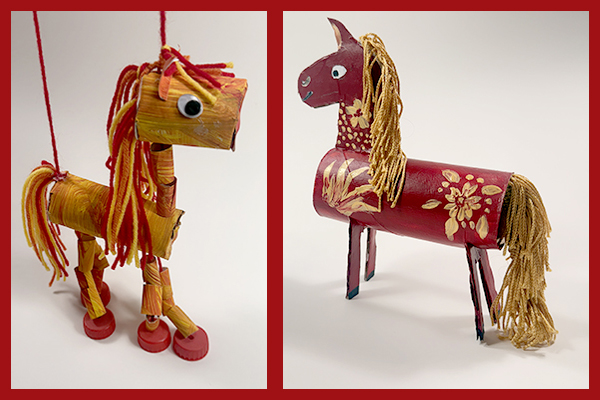
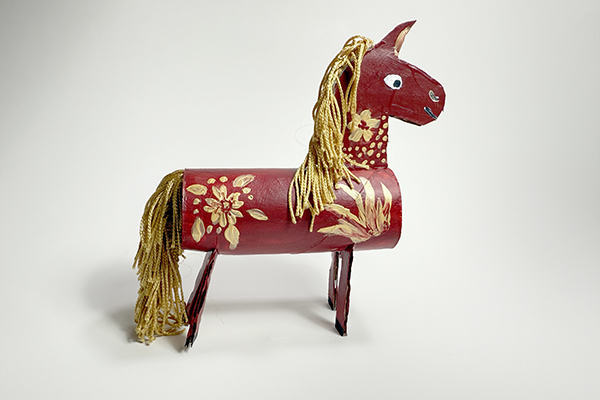
Local art teacher, Alyssa Navapanich, created two awesome fire horse projects to help celebrate Lunar New Year 2026 (the Year of the Fire Horse). The Marionette Horse and the Stationary Horse require cardboard tubes and other supplies you probably have lying around the house.
SUPPLIES
Cardboard tubes from paper towel or toilet paper
Red, yellow, orange, black, white and gold paint
12”x 18” red construction paper or 12”x 18” white paper
Paintbrush
Scissors
Hole punch
Marker or paint pen for details
Water cup
White or hot glue
Nail or ice pick
Tape
Optional: googly eyes, fringe
Plus, for marionette horse:
2 craft sticks
Yarn in red, yellow and orange
String or yarn
Bottle caps or cardboard scraps
Straws or painted paper tubes
4 pennies or washers (if making cardboard feet)
Plus, for stationary horse:
Cardboard scraps
4 craft sticks cut to 3 inches OR two pieces of 2½” x 1½” cardboard for legs
Gold fringe or yarn in gold or yellow
I always start projects by covering my workspace with an opened large paper bag, placemat or plastic cloth.
DIRECTIONS
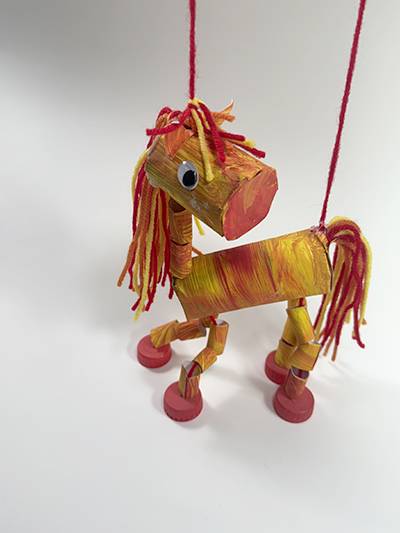
How to Make Marionette Horse
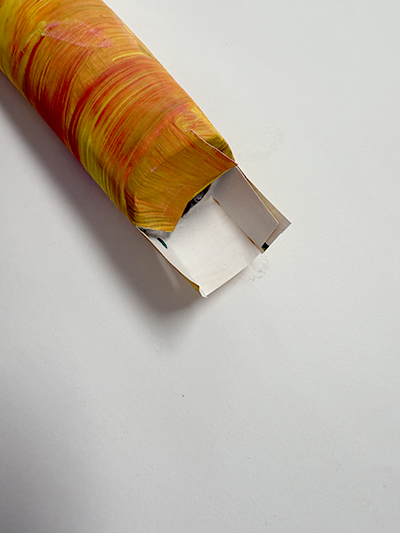
1) Start with a 4.5” cardboard tube for the body and a 2¼” section for the head. Set aside.
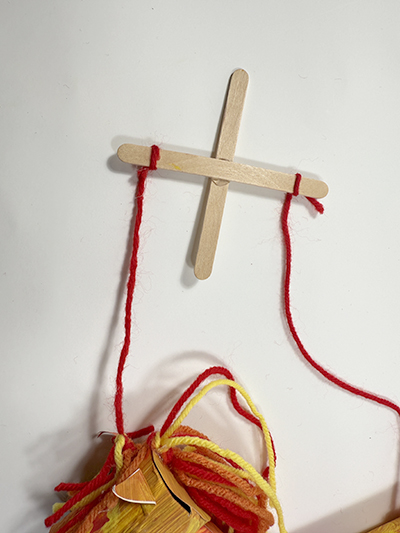
2) Make the controller by gluing two craft sticks together in an X shape. Set aside.
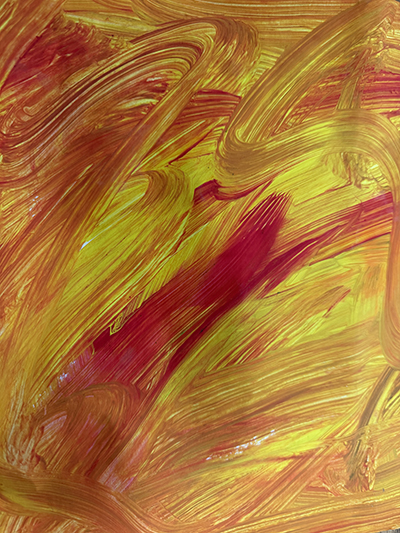
3) If using white construction paper, paint it yellow, covering most of the surface. While the paint is still wet, add a few drops of red paint. Spread and mix the paint until you have a color and texture you like. Alternatively, you can use red construction paper.
4) Cut paper 6”x 8” for the body; cut a 4”x 6” piece for the head.
5) Leaving about one inch on either open end, wrap both tube sections in colored paper, gluing it down. Allow to dry.
6) Cut nine pieces of yarn (three of each color) into 10” lengths and fold in half. Cut a short piece of yarn and tie the long pieces together at the fold. Glue the yarn inside the top open end of the larger tube form a tail. Allow glue to dry.
7) Punch a hole in the top edge, opposite the tail, for the neck string.
8) Punch two holes about ½ inch apart under the neck hole and repeat under the tail for the legs.
9) Prepare bottle cap feet by poking a hole in the center for the string. If using cardboard, cut 4 cardboard discs about 1 inch in diameter. Poke hole in center of cardboard.
10) For the feet, cut a 10” piece of yarn. Thread one end of the yarn through one hole and out the other. Add three paper tubes or straws cut into 1-inch lengths. Thread the string through the top of the bottle cap and secure underneath with a knot. Repeat for other legs.
11) Thread the head string through the body of the horse and tie a knot. Secure in place with tape.
12) Add two 1-inch paper tubes, then thread the string through the bottom and then the top of the head. Tie the end of the string onto one end of the controller. Cut a 10” piece of string for the back of the horse. Tie one end of the string to the tail and the other end to the controller. Adjust length of tail string, so when standing the horse is level.
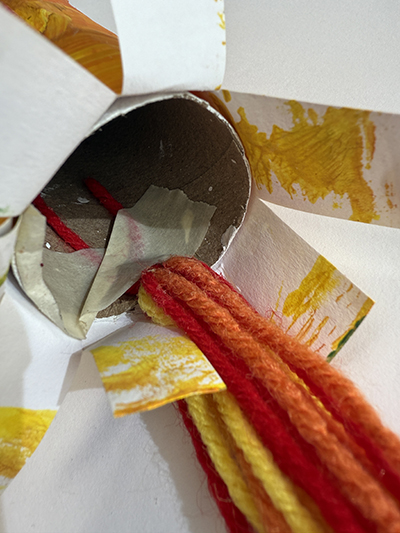
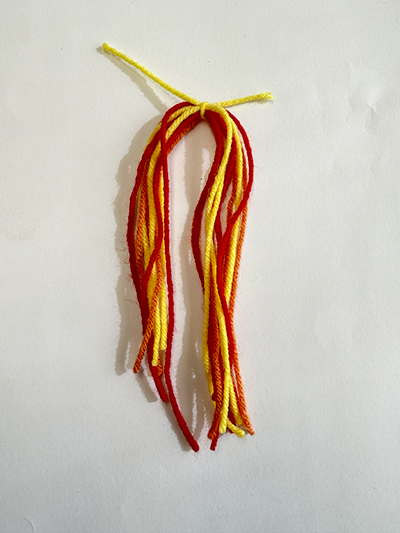
13) Make the forelock and mane: Cut 15 10-inch pieces of red, yellow and orange yarn. Tie to a 6” piece of string. Glue about six pieces to the head so they fall forward to create the forelock. Glue the rest of the mane to the back of the head; do not glue to the neck pieces. Trim to desired length.
14) Carefully snip the ends of the paper on each tube at about ½ inch intervals. Fold over and glue to close the end of the tubes. To add a more finished look, cut four 1½” circles from painted paper and glue to the ends of the tubes. Add googly eyes or draw eyes.
How to Make a Stationary Fire Horse
1) Start with a 4.5” cardboard tube for the body.
2) Cut out the horse head and legs from cardboard scrap. Paint on both sides. Add black to the ends of the legs for hooves. If you use craft sticks, paint both sides of the craft sticks in a similar manner allowing all painted items to dry.
3) To assemble, glue head onto one end of the cardboard tube.
4) For legs: If using craft sticks, glue the craft sticks to the sides of the horse: two in front and two in back. If using cardboard for legs, draw a letter “u” shape that is 2.5” x 1.5”. Cut out a thin rectangle in the center that is about one inch from the bottom of the “u” and ½ inch wide. Cut two slits at the bottom of the horse parallel to the tube openings. Slide the legs in place. Add a dab of glue to secure.
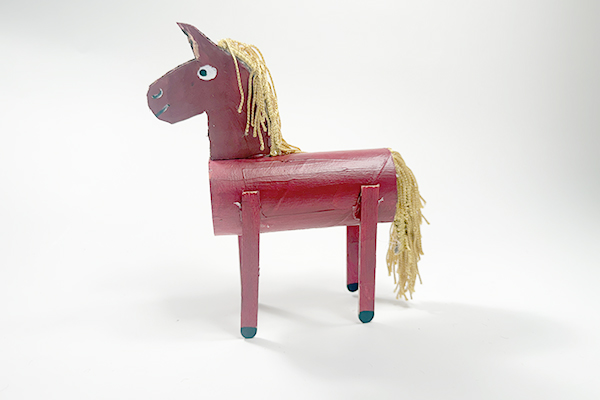
5) For the mane, cut fringe to fit the head about 2½” long. Glue to the edge of the cardboard. Trim as needed. For the tail, cut a 6” piece of fringe, fold in half and glue so that the fringe is doubled. Glue open end of fringe to the inside top of the back of the horse.
6) If using yarn for the mane, cut 12 pieces of red, yellow and orange yarn (10” long). Tie to a 6” piece of string. Glue mane to the edge of the cardboard. Trim to desired length.
7) Cut nine pieces of yarn, three of each color, into 10” pieces; fold in half. Cut a short piece of string and tie the long yarn together at the fold. Glue the yarn inside the top open end of the larger tube to form the tail. Allow glue to dry.
8) Add face details to the horse with paint or markers. Add decorative accents to the body and neck with gold paint.
Alyssa Navapanich is an award-winning art educator who teaches art to elementary school kids in East San Diego County.
To learn more about Chinese culture in San Diego, visit the San Diego Chinese Historical Museum. To learn more about Lunar New Year, see the list of picture books about Lunar New Year at the end of these projects.
2025 was Year of the Snake
Find our Year of the Snake craft at https://www.sandiegofamily.com/for-the-kids/crafts-for-kids/easy-paper-snake-craft.
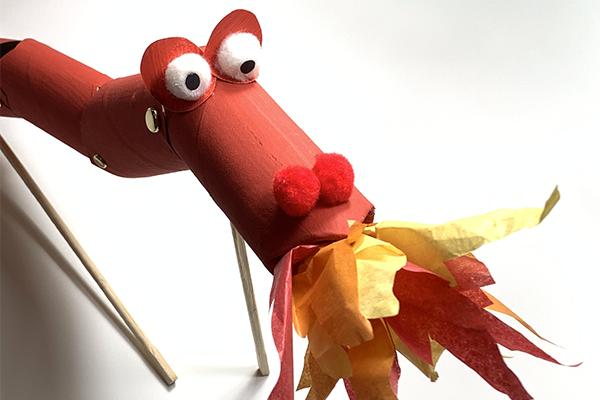
2024 was the Year of the Dragon: Lunar New Year Dragon Puppet
Dragons represent wisdom, good luck, health and strength. An odd number of dragon segments is more auspicious than even numbers, which is why this project consists of five segments. Did you know? Dragons are the only mythological creature in the Chinese Zodiac.
SUPPLIES
- Five 4” cardboard tubes
- Red paint
- Water cup
- Paintbrush
- Hole punch
- Black scrap paper
- Scissors
- Craft glue
- One piece of red construction paper or cardstock
- White and red pom-poms
- Red, yellow and orange tissue paper (about 4” x 6”)
- Paper fasteners*
- 2 chopsticks, dowel rods or bamboo skewers
- Glue gun or glue dots
I always start projects by covering my workspace with an opened large paper bag, placemat or plastic cloth.
DIRECTIONS
1) Paint all cardboard tubes red; allow to dry.
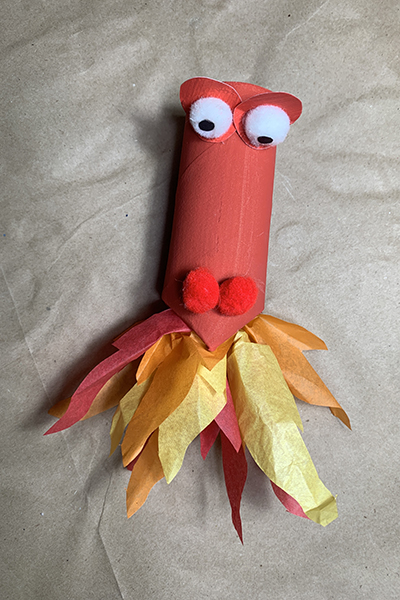
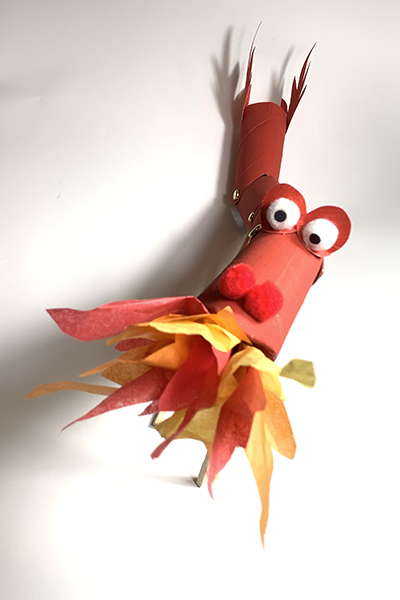
2) Make a dragon head:
- Fold one end of the tube in to make the mouth/snout. Glue on two red pom-poms as shown in the photo.
- Cut red, yellow and orange flame shapes from tissue paper, gather together and glue into the mouth. It might be easier to connect all the flames at one end (with a couple of staples or tape), so you only have to glue in one piece.
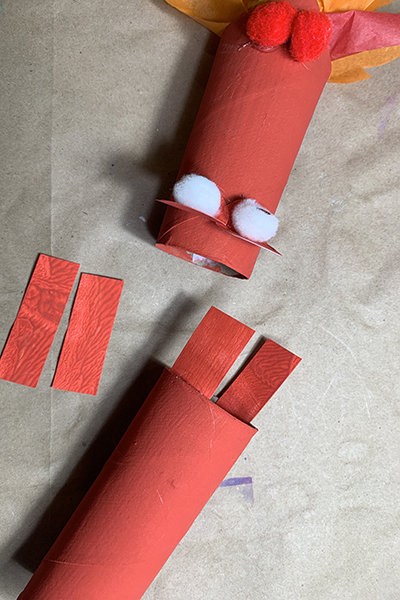
- For the eyes, cut two ovals from red paper. Fold down about ¼ of the oval and glue to the opposite end of the tube so that the larger part of the oval is up; repeat with second oval, glue the white pom-pom “eyes” onto the ovals. See photo for reference.
- Use a hole punch to make two black dots for pupils; glue them to white pom-poms.
 .
.
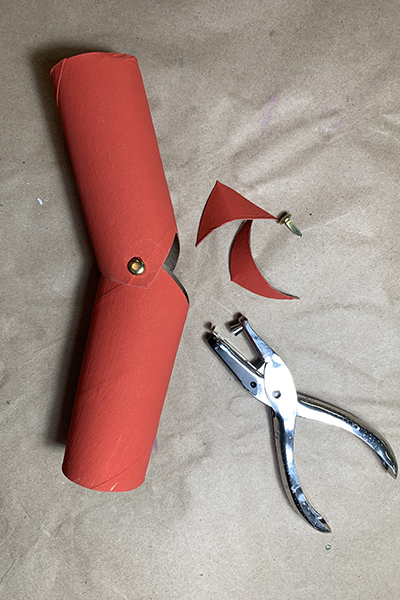
3) Make the body*:
- Hole punch each pointed tip. Arrange segments so that holes line up and attach paper fasteners. Keep them loose enough that the dragon can move. Again, see photos for reference.
- Cut the end of each segment (cardboard tube) in a slight triangle shape that points outward away from the center. This is where each body segment will attach to other segments. Leave one tube with one flat end for the tail.

4) Make the tail:
- Cut red cardstock in a flame shape and glue onto the remaining flat end.
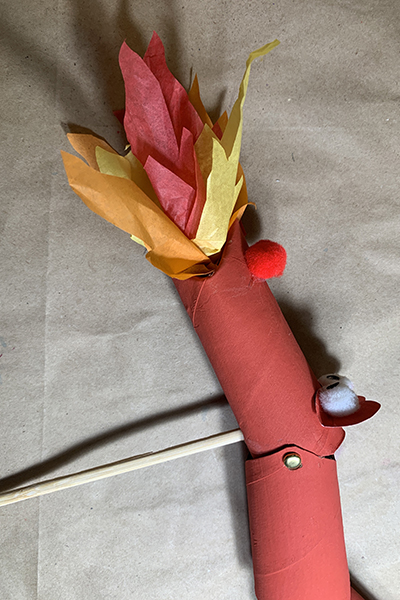
5) Poke a hole in the bottom of the head section and press a chopstick into it, affixing with a bit of hot glue. Repeat in the section just before the tail.
*Optional way to connect body segments, instead of using paper fasteners:
Connecting segments with paper fasteners on the inside of the tubes is challenging. As an alternative, create a movable puppet using ribbon instead of fasteners. If you choose to do it this way, it’s not necessary to cut triangular shapes on the ends of the tubes. I didn’t have red ribbon handy, but I tried it with strips of paper (as shown below) and it worked, but the dragon would be more flexible using ribbon.
Lunar New Year Picture Books for Kids
- A Sweet New Year for Ren by Michelle Sterling; illustrated by Dung Ho
- The Race for the Chinese Zodiac by Gabrielle Wang
- I Love Lunar New Year by Eva Wong Nava
- Mai’s Áo Dài by Thai Nguyen & Monique Truong
- We Are Lion Dancers by Benson Shum
- Ping’s Perfect Pot by Helen H. Wu
- Tomorrow is New Year's Day: Seollal, a Korean Celebration of the Lunar New Year by Aram Kim
- 12 Lucky Animals: A Bilingual Baby Book by Vickie Lee; illustrated by Joey Chou
- Ruby's Chinese New Year by Vickie Lee; illustrated by Joey Chou
- The Tray of Togetherness by Flo Leung
Alyssa Navapanich is an award-winning art educator who teaches art to elementary school kids in East San Diego County.


