miniature Easter baskets

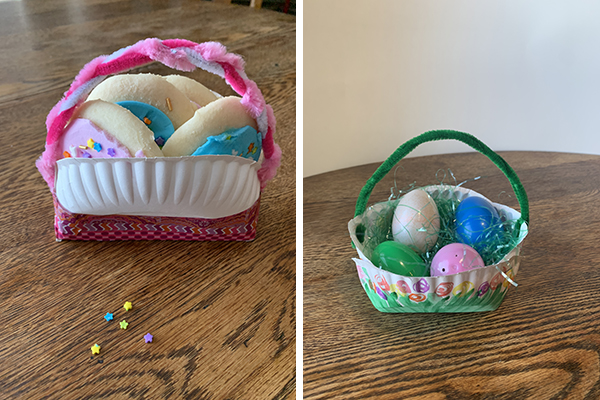
Make miniature baskets using simple materials like paper plates, pipe cleaners and markers; then deliver springtime treats to neighbors and friends!

Supplies

Paper plates, one per basket

Markers or crayons

Paint-acrylic, tempera, or watercolor in bright or pastel colors plus water cup and paintbrush 

Pencil

Ruler

Scissors 

Stapler

Clear tape

Chenille stems/pipe cleaners, 3 per basket

Hole punch

Washi tape in bright colors

Directions for Round Basket (pictured at beginning with eggs)

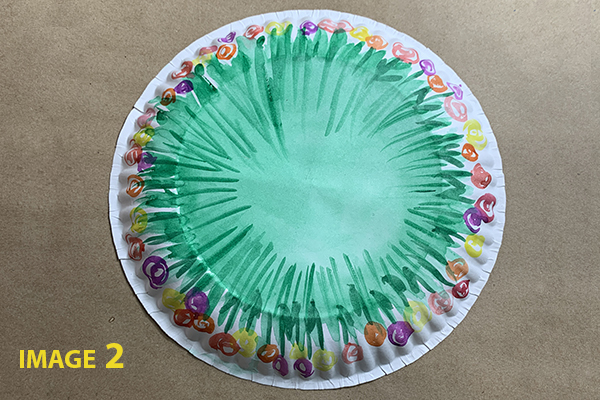
  1. Decorate the convex side (underside) of a plate with markers or paint. Draw flowers or a scene, or just add color in an abstract way. The center of the plate will become the bottom of the basket and the edges will become to top. (See image 2.) To create a flower scene, paint the bottom center of the plate green. Paint/draw thin blades of grass, then add bright colored flowers at the ends of the stems and any desired additional details. 

    basket 2 1126

  2. Allow to dry.

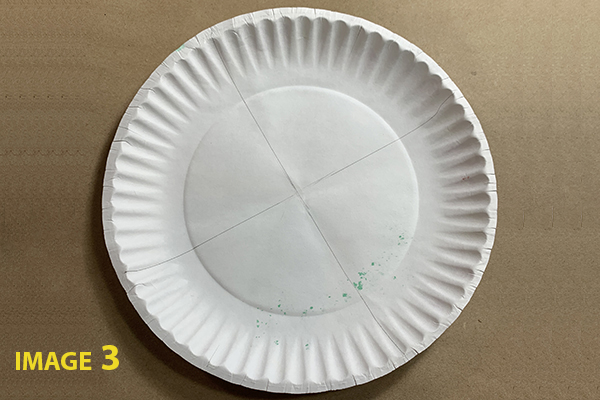
  3. Flip the plate over to the non-painted side. Using a ruler, draw a horizontal line (in light pencil) from one side to the other that goes through the exact center of the plate. Turn the plate to make another horizontal line through the center, creating an “x” in the middle. (See image 3.)

    basket 3 1126

  4. Starting from the edge, cut about 2–2 ½ inches along each line. Note: longer cuts will result in a deeper, narrower basket. 

  5. Bring each corner together and staple or tape to secure in basket/bowl shape. It helps to gently fold along the bottom. (See image 4.)

    basket 4 1126

  6. Braid three colored chenille stems together to make a handle.

  7. Use a hole punch to make two holes -- one on one edge of the basket and the other directly across from it.

  8. Thread one end of the handle through the hole and fold over to secure. Do the same for the other end. Secure with clear tape. 

  9. Fill with fake grass, plastic eggs or candy, as desired. 

Note: Also use clear tape to cover staples, if needed. 

Directions for “Treat” Basket (pictured at beginning with cookies)

  1. Using image 5 as a reference, fold two opposite sides of a plate about 3 ¼ inches from the edge.  The center “strip” will be the base of the basket.

  2. Fold the other two edges about 2 inches in from the edge (see dotted lines in image 5). 

    basket 5 1126

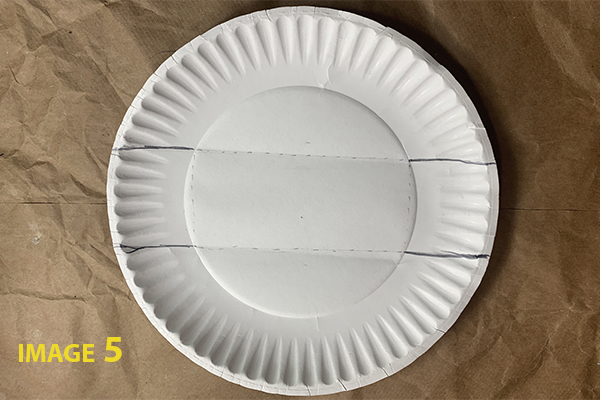
  3. Cut 2 inches into the plate at the end of each first fold (see bold pencil lines in image 5).

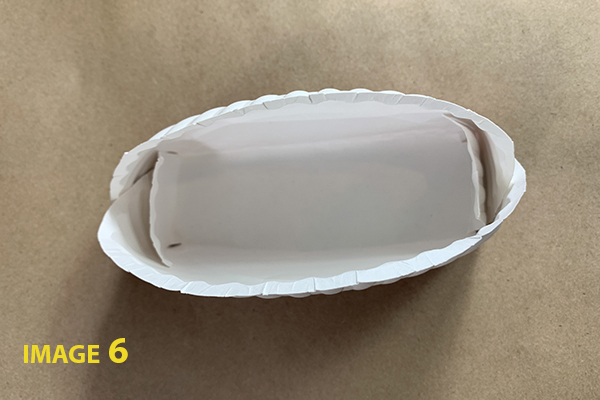
  4. Fold all sides up and secure with staples or tape. (See image 6.)

    basket 6 1126

  5. Wrap bottom of basket with brightly colored washi tape. 

  6. Braid three chenille stems to create a handle. 

  7. Punch one hole in each end of the basket and thread one end of the handle through each hole. Fold over to secure.

  8. Secure both with clear tape. 

Note: Also use clear tape to cover staples, if needed. 

Fun Facts:

  • Historians believe that baskets were used even before pottery or stone carvings. 
  • The Easter basket as we know today became popular during the Victorian period to hold eggs and treats. 

Alyssa Navapanich is a nationally recognized and award-winning art educator who teaches art to elementary school kids in East County. All photos are provided by her.

______________

Art with Alyssa: Earth Monoprints

Art with Alyssa: Earth Monoprints

Celebrate Earth Day by doing an art project at home and participating in local Earth Day events around San Diego. Discussion Points for Teachers/Parents How to take care of the planet—Reduce, . . .

Read more

Art with Alyssa: How to Make a Nature Journal

Art with Alyssa: How to Make a Nature Journal

Creating and maintaining a nature journal is a fun, relaxing and educational activity for children (and adults) that encourages time outdoors and connection with nature. There is no right way to kee . . .

Read more

Art with Alyssa: Recycled Egg Carton Flowers

Art with Alyssa: Recycled Egg Carton Flowers

Turning trash into treasure is not only fun, it’s great for the planet. You’ll love this recycled art project that transforms a paper egg carton into a beautiful bouquet of flowers—perfect for . . .

Read more

Art with Alyssa: Nature Weaving

Art with Alyssa: Nature Weaving

Supplies Twigs or sticks, 6–12” long Garden clippers Scissors Twine or yarn Variety of grasses, flowers and plants with long stems. (I used buttercup, euryops, geranium, lavender, rosemar . . .

Read more

Art with Alyssa: Nature's Paintbrushes

Art with Alyssa: Nature's Paintbrushes

Create beautiful outdoor art using homemade paintbrushes from plants and items found in nature.Tips for Teachers/ParentsTeach children to respect living plants and only use found or discarded flower . . .

Read more

Art with Alyssa: Recycled Paper Bowl

Art with Alyssa: Recycled Paper Bowl

Not sure what to do with all those old magazines? Get creative and turn the pages into paper bowls or coasters! This is a great project to celebrate Earth Day – or just a fun way to spend a lazy a . . .

Read more

Raindrop Drip Painting

Raindrop Drip Painting

We don’t know many kids who can resist jumping in rain puddles. And since we don’t get rain puddles too often in San Diego, it’s a particularly unique and special activity! Why not commemorate . . .

Read more

DIY Instruments for Kids

DIY Instruments for Kids

Get creative and have a festive backyard parade with these beautiful homemade musical instruments! Local artist Emily Dolton shares step-by-step instructions on how to make a Melon Maraca, Citrus Dr . . .

Read more

Art with Alyssa: Paper Bag Memory Books

Art with Alyssa: Paper Bag Memory Books

Create a unique memory book to save special keepsakes and photos—and to reminisce about all the fun you had this summer!Discussion Points for Parents/Teachers Talk about your favorite summer me . . .

Read more

Smiling Sun Craft

Smiling Sun Craft

Brighten up a spring or summer day with a smiling sun craft made with colorful yarn and glue. This project also makes a festive Cinco de Mayo decoration. Get creative and make your own unique design . . .

Read more

DIY Drip Painting

DIY Drip Painting

Surprise Mom with this colorful art project that will light up her special day and make a cool piece of wall art for your home. Since the look is achieved from paint drips, each finished product is . . .

Read more

Art with Alyssa: African Maasai Family

Art with Alyssa: African Maasai Family

Celebrate diversity and families with this easy project that utilizes fabric scraps and materials you may already have. Consider framing the finished artwork and gifting it to a family member. The p . . .

Read more

Make and Send a Hug to Loved Ones

Make and Send a Hug to Loved Ones

Don’t you miss hugging people? Here’s a clever DIY hug craft that lets loved ones know they are missed! Whether it’s Mother's Day, Father’s Day, Teacher Appreciation, a birthday or some othe . . .

Read more

Art with Alyssa: How to Make a Tapa or Siapo Cloth

Art with Alyssa: How to Make a Tapa or Siapo Cloth

One way to learn about Asian American Pacific Islander (AAPI) Heritage Month is to do an art lesson and project together as a family, group of friends, class or scout group. Here we learn about tapa . . .

Read more

Be Family Informed – Sign up for our Newsletters below!

Subscribe