IMG 9168

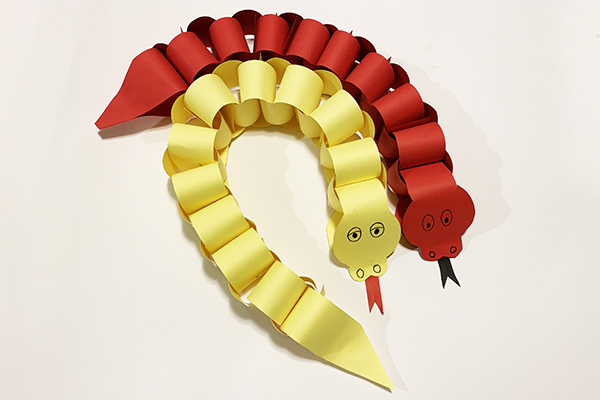
2025 is the Year of the Snake! Lunar New Year is celebrated by one fifth of the world’s population in countries such as China, Korea, Vietnam, Thailand, Malaysia and Singapore as well as diasporic communities. Each year is represented by one of the 12 animals in the Chinese zodiac. Kids will love crafting this easy snake out of paper to honor this year’s Chinese zodiac symbol. 


The Lunar New Year celebration begins with the first new moon of the lunar calendar (this year, it starts Jan. 29, 2025) and typically ends 15 days later on the first full moon of the lunar calendar.  There are many days of family celebrations and religious ceremonies, with red envelopes given, lion and dragon dances and fireworks. The Lantern Festival is on the final Lunar New Year celebration day, featuring colorful lanterns and traditional foods like sticky rice balls and dumplings. 


Here’s how to make an easy paper snake for the Year of the Snake:


SUPPLIES

4-6 sheets of 8.5” x 11” construction paper or cardstock in bright colors (I used red and yellow cardstock) 

Pencil 

Scissors

Ruler (optional) 

Glue or glue stick

Paperclip or clothespin

Stapler

Markers (to draw the face and add optional patterns to the snake segments)


DIRECTIONS

Cover your workspace with an opened large paper bag, placemat or plastic cloth. Note: measurements are based on 8.5” x 11” cardstock.

  1. Cut strips of paper about 2 inches wide by 8.5 inches long. The more strips you use, the longer the snake will be. I used 17 strips for the red snake and 21 for the yellow. 

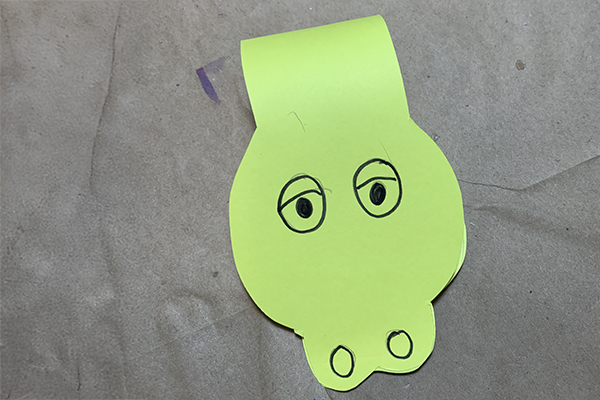
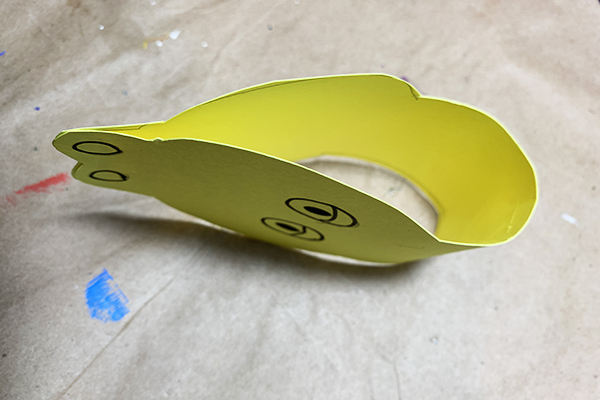
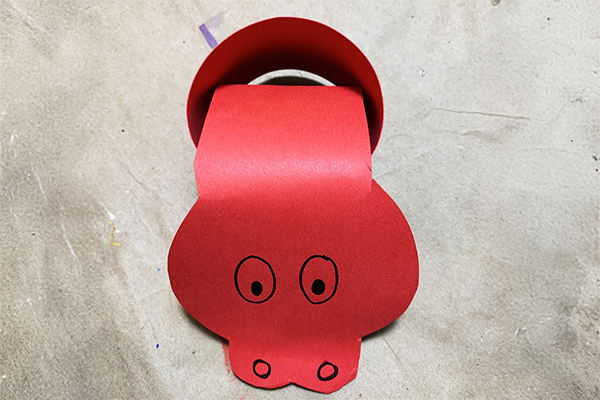
  2. Using the printable pdf (CLICK HERE), cut out the head for the snake. Place the pattern on the fold of the cardstock and trace one side so that both sides are symmetrical. See photo of finished snake for reference. Draw eyes and nostrils. Set aside. 
    IMG 9164  

  3. For the tail, fold one of the strips in half and taper the tail to a point (see finished photo for reference). Set aside.
    IMG 9170
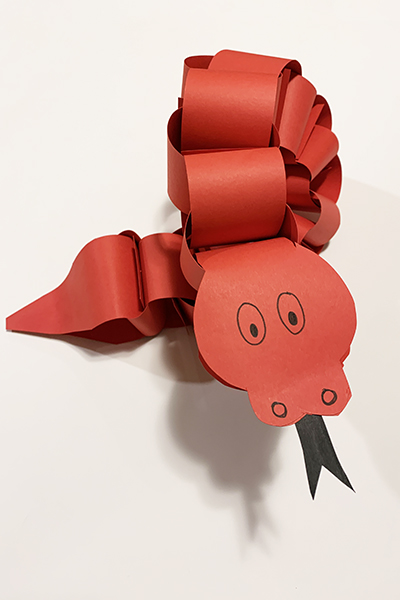
  4. To make a tongue, cut a strip that is 2 inches long and ½ inch wide. Cut a thin triangle out of the end to make the tongue “forked.”

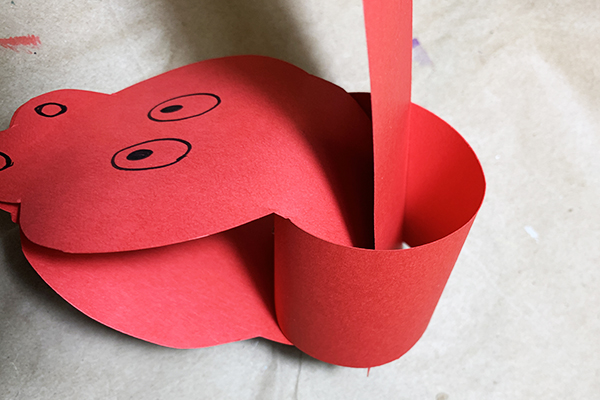
  5. To assemble, begin by looping the head of the snake, gluing the two nostril ends (but place the tongue in between the ends before securing). Use a paperclip or clothespin to hold the tongue in place and nostrils together while it dries.    
    IMG 9165
  6. Add the first ring of paper to the head by threading it through the head loop and gluing or stapling it closed. Continue to do this until the snake is as long as you want. More loops make the snake longer. Note: Tighter loops prevent the snake from being flexible. Make the loops a little bigger if you want more “movement” in the snake. 
    IMG 9166

    IMG 9167
  7. For the tail, thread the pointed paper through the last snake body loop and glue the ends of the tail together. Hold with a paperclip until it dries, if needed. 
    IMG 9168


Alyssa Navapanich is an award-winning art educator who teaches art to elementary school kids in East County San Diego.


Art with Alyssa: How to Make a Leprechaun Trap

Art with Alyssa: How to Make a Leprechaun Trap

Have fun this St. Patrick’s Day making leprechaun traps with the kids. Start by reading a related story, such as How to Catch a Leprechaun by Adam Wallace, for inspiration. Then use your imaginati . . .

Read more

Lucky Leprechauns

Lucky Leprechauns

This St. Patrick’s Day create some cute leprechauns from plastic eggs and craft scraps.SuppliesGreen plastic Easter eggsScraps of craft foam, felt or paperSmall, miscellaneous craft items (ribbon, . . .

Read more

Art with Alyssa: Shamrock Watercolor Banner

Art with Alyssa: Shamrock Watercolor Banner

Here’s a St. Patrick’s Day art project the whole family can get excited about! Make beautiful watercolor designs and cut them into shamrock shapes to make a decorative banner or cards for loved . . .

Read more

Swirly Shamrocks

Swirly Shamrocks

Craft this cute shamrock for St. Paddy’s Day with green paper, glue and a little glitter. You'll Need:4 sheets of 8 1/2 x 11 green cardstock or construction paperPencilRulerScissorsWhite glueTr . . .

Read more

Art with Alyssa: How to Make a Nature Journal

Art with Alyssa: How to Make a Nature Journal

Creating and maintaining a nature journal is a fun, relaxing and educational activity for children (and adults) that encourages time outdoors and connection with nature. There is no right way to kee . . .

Read more

Art with Alyssa: Nature's Paintbrushes

Art with Alyssa: Nature's Paintbrushes

Create beautiful outdoor art using homemade paintbrushes from plants and items found in nature.Tips for Teachers/ParentsTeach children to respect living plants and only use found or discarded flower . . .

Read more

Art with Alyssa: Nature Weaving

Art with Alyssa: Nature Weaving

Supplies Twigs or sticks, 6–12” long Garden clippers Scissors Twine or yarn Variety of grasses, flowers and plants with long stems. (I used buttercup, euryops, geranium, lavender, rosemar . . .

Read more

Art with Alyssa: Recycled Egg Carton Flowers

Art with Alyssa: Recycled Egg Carton Flowers

Turning trash into treasure is not only fun, it’s great for the planet. You’ll love this recycled art project that transforms a paper egg carton into a beautiful bouquet of flowers—perfect for . . .

Read more

Art with Alyssa: Marble Painting

Art with Alyssa: Marble Painting

  Marble painting is a great art project that encourages eye-hand coordination and muscle control. It’s fun to experiment with different colors and designs and it’s easy to adapt the project . . .

Read more

Raindrop Drip Painting

Raindrop Drip Painting

We don’t know many kids who can resist jumping in rain puddles. And since we don’t get rain puddles too often in San Diego, it’s a particularly unique and special activity! Why not commemorate . . .

Read more

Art with Alyssa: Recycled Easter “Eggs”

Art with Alyssa: Recycled Easter “Eggs”

Combining Easter fun and environmental awareness in honor of Earth Day is a win-win in our eyes. Here are instructions to make DIY Easter “eggs”— a fun and clever way to wrap and hide treats f . . .

Read more

Art with Alyssa: DIY Easter Treat Baskets

Art with Alyssa: DIY Easter Treat Baskets

Make miniature baskets using simple materials like paper plates, pipe cleaners and markers; then deliver springtime treats to neighbors and friends! Supplies Paper plates, one per basket Marker . . .

Read more

Easter Egg Decor

Easter Egg Decor

Decorate real eggs this Easter to look like sweet treats such as cupcakes, lollipops and wrapped candies. SuppliesEggsEgg decorating kit/dye of choiceSmall pieces of colored and clear cellophaneBake . . .

Read more

Spring Bunny Cup

Spring Bunny Cup

This spring, craft a cute bunny cup to hold Easter treats! You'll Need:Paper cupScraps of pretty paper12” length of crepe paper streamerChenille stemGlitter3 buttons3 pom-pomsWhite gluePencilMark . . .

Read more

Be Family Informed – Sign up for our Newsletters below!

Subscribe