Everyone loves advent calendars that reveal a daily surprise—it's also really fun to make them! Start your own family traditions in the days leading up to Christmas (or any celebration). Here are two fun DIY advent calendars to consider: one embraces doing things together (and for others), while the other is a fun spin on opening a small treat each day.
MAKING MEMORIES ADVENT CALENDAR
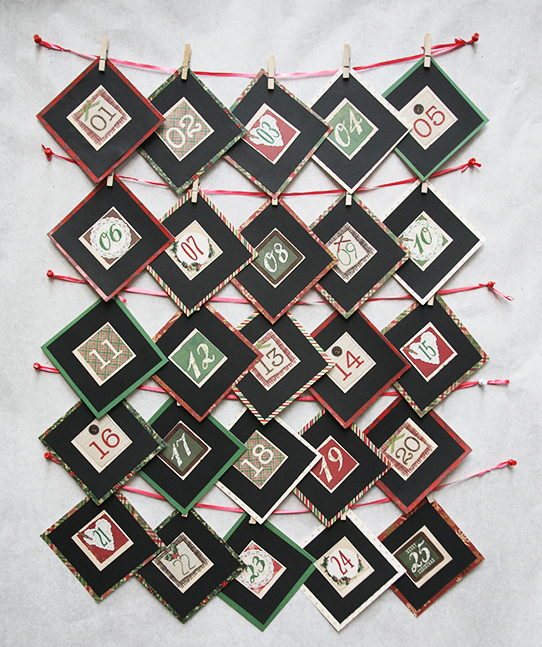
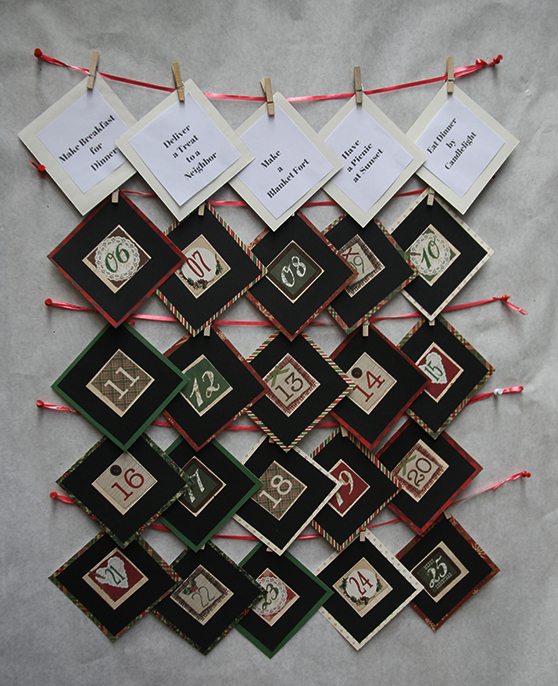
There’s no candy or toys in this advent calendar—each day reveals an activity—starting a new family tradition, doing something for a friend or neighbor, participating in a favorite holiday pastime. Your family comes up with the fun ideas! Get the kids involved—they'll love helping to brainstrom ideas, plus writing, cutting and gluing increase fine motor skills.
Discussion Points for Parents and Teachers
- Activities kids love to do with family
- Ways to help others
- Different holiday traditions
Supplies
- Colored construction paper or cardstock
- Scissors
- Markers
- Glue stick or white glue
- String or ribbon
- Clothespins or clips
- Optional: pre-printed numbers (1 through 25)
Directions
- Make a list of 25 fun activities your family can easily do together. Some suggestions:
• Make breakfast for dinner.
• Make a blanket fort.
• Have a sunset picnic.
• Learn about a tradition from another culture.
• Read a book in a funny voice.
• Eat dinner by candlelight.
• Make hot chocolate from scratch.
• Do a kind deed for a friend.
• Make a donation to a food bank.
• Tour holiday lights in your pajamas (with San Diego Family’s Map of Christmas Lights, of course). - Cut 25 (4.5”x 4.5”) squares of colored paper to put the numbers on. They can be the same color or different.
- Adhere pre-printed numbers to the center of each square or write numbers 1 through 25. Allowing children to write numbers is good writing practice. For young children, write the numbers in pencil and let them trace over them with marker.
- Add embellishments around the numbers, if desired: draw frames, colored outlines, curved lines, etc. Be creative!
- Cut 25 (5”x5”) squares of colored cardstock, patterned paper or construction paper.
- If these squares have different patterns or colors, lay them out in desired order before adhering numbers.
- Glue the squares with numbers to the center of the larger squares.
- Write one activity from the list on the back of each square (or print activities and glue on).
- Let dry.
- Use clips to hang the squares (numbers facing out) on a string or ribbon.
- Each day, turn a square over to reveal that day’s activity. Have fun!
- Optional: When the activity is complete, write a note about the family’s experience on the card. When it’s time to take the calendar down, create a mini memory book by punching holes in the squares and connecting the pages with string.
Note: This countdown calendar project can be designed for other holidays or momentous events such as birthdays, a wedding or graduation.
Alyssa Navapanich is a nationally recognized art educator who teaches art to elementary school kids in East San Diego County.
____________
CHRISTMAS TREE ADVENT CALENDAR
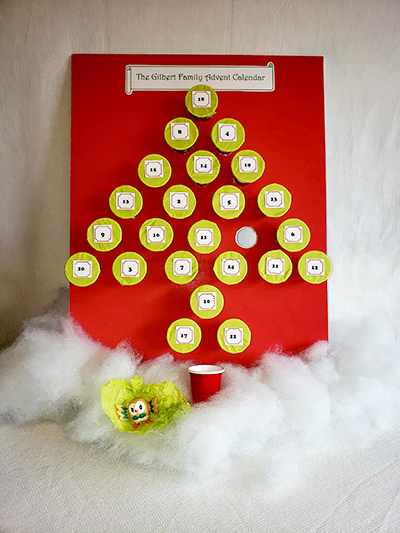
Use mini Solo cups and green tissue paper to create a cute tree that hides 24 treats to open daily.
Supplies
- 24 mini (2 oz.) red Solo cups
- Green tissue paper
- 24 rubber bands
- White or holiday-colored printer paper
- 14”x 18” foam core or thick cardboard
- 24 toys or treats
- White craft glue
- Exacto knife
- Scissors
Directions
- Using a coffee cup or water glass to measure, cut 24, two-layer, 4” diameter circles of green tissue paper.
- Fill each cup with desired toys or treats. Stretch the double layer circles of tissue paper evenly across each filled cup and secure with the rubber band.
- Print the numbers 1–24 on white or decorative paper, no larger than one-inch square (or write numbers on blank stickers).
- Glue a number to each cup.
- Print a title for your advent calendar on decorative paper, such as “24 Days of Christmas”, or “Smith Family Holiday Calendar.” Glue to the top of the calendar.
- Below the title, draw twenty-four 1¼” circles on the cardboard, arranged in a Christmas tree pattern: one on top, two in the second row, then three below that, then four, five and six, leaving ¾” space between each circle (in every direction). Below the row of six, create the tree trunk with one circle and then two, as depicted in the photo.
- Carefully cut out the circles with an Exacto knife and discard. Put glue on the edges of each hole and place a cup in each. The cups should stop about halfway through the holes.
- Allow to dry overnight.
- Each day, kids punch through the tissue to receive their treat!
Emily Dolton is an artist and mom of two advent calendar chocoholics-who come by it honestly!
____________


