poinsettia yarn craft

Create a yarn painting featuring the season's favorite festive flower, the poinsettia. Find books about poinsettias at your local library to learn more about them.
Did you know?

Poinsettias are native to Mexico. They're named after Joel Poinsett, the first U.S. Minister to Mexico.

This type of yarn art originated in Mexico and South America.  

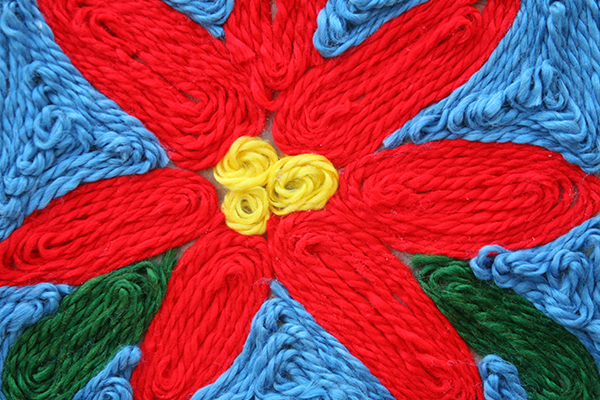
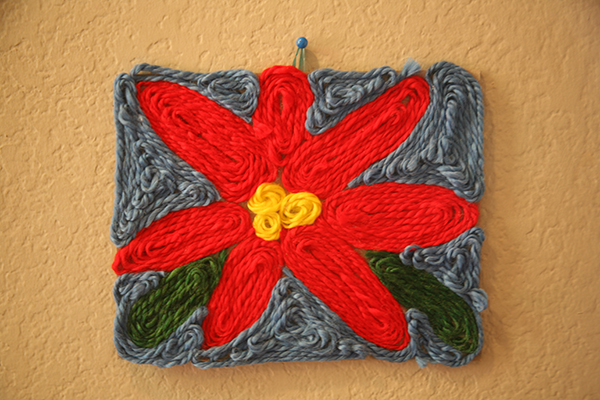
The red "petals" are called bracts; the yellow buds in the center are the flower.
Supplies

  • Newsprint or paper grocery bag
  • Damp paper towel
  • Cardboard or cardstock (or cut a cereal box to approx. 9" x 12")
  • Pencil
  • White Elmer's glue
  • Yarn (red, yellow, blue/gray, green)
  • Scissors
  • Toothpick

Directions

  1. Cover your workspace with newspaper; place a damp paper towel nearby for sticky fingers.
  2. Use a pencil to draw three circles in the center of the cardboard. This will be the middle of the flower.
  3. Draw 5–7 ovals coming off the center circles. These will be the red "petals."
  4. Draw two more ovals between the first set of ovals to represent green leaves.
  5. Outline and fill a circle with a light coating of glue. Starting on the outside of the circle, gently place yellow yarn onto the glue around the edge.
  6. As you close the circle, bring the yarn as close to the first row of yarn as possible. Push with a toothpick if needed. Continue until each circle is filled with yarn.
  7. Cut the end of the yarn and tuck under by pushing the end with a toothpick.
  8. Repeat this process with the red petals, green leaves and blue/gray background, outlining first and filling in with rows of yarn until you reach the center. Let dry completely.
  9. Optional: Turn the artwork into a wall hanging by gluing a loop of yarn on the back.


Note: For younger children, cut the yarn into 1-inch pieces and have them fill the spaces with cut yarn. Using large plastic tweezers will help improve their hand-eye coordination.  
Other ideas

Wall hanging.Draw a different shape to fill in with yarn. Simple outlines work best (try different flowers or an apple).

For a more flat yarn painting, place a sheet of waxed paper over the completed artwork and cover with a book to help it dry flatter.


Alyssa Navapanich is an art enthusiast who teaches art to elementary school kids in North County.

Published December 2016

How To Train Your Dragon Movie Activity Kit

How To Train Your Dragon Movie Activity Kit

Set on the rugged, windswept island of Berk, the movie How to Train Your Dragon follows Hiccup, a clever but underestimated teen who doesn’t quite fit in with his fellow Viking dragon-slayers. When . . .

Read more

Art with Alyssa: Nature Pendants

Art with Alyssa: Nature Pendants

Spring is an excellent time for nature-inspired art projects for kids. This month’s “Art with Alyssa” project provides instructions to make nature pendants, which make wonderful gifts for . . .

Read more

Art with Alyssa: Nature Weaving

Art with Alyssa: Nature Weaving

Supplies Twigs or sticks, 6–12” long Garden clippers Scissors Twine or yarn Variety of grasses, flowers and plants with long stems. (I used buttercup, euryops, geranium, lavender, rosemar . . .

Read more

Art with Alyssa: Nature's Paintbrushes

Art with Alyssa: Nature's Paintbrushes

Create beautiful outdoor art using homemade paintbrushes from plants and items found in nature.Tips for Teachers/ParentsTeach children to respect living plants and only use found or discarded flower . . .

Read more

Art with Alyssa: How to Make a Nature Journal

Art with Alyssa: How to Make a Nature Journal

Creating and maintaining a nature journal is a fun, relaxing and educational activity for children (and adults) that encourages time outdoors and connection with nature. There is no right way to kee . . .

Read more

Art with Alyssa: Recycled Egg Carton Flowers

Art with Alyssa: Recycled Egg Carton Flowers

Turning trash into treasure is not only fun, it’s great for the planet. You’ll love this recycled art project that transforms a paper egg carton into a beautiful bouquet of flowers—perfect for . . .

Read more

Smiling Sun Craft

Smiling Sun Craft

Brighten up a spring or summer day with a smiling sun craft made with colorful yarn and glue. This project also makes a festive Cinco de Mayo decoration. Get creative and make your own unique design . . .

Read more

Art with Alyssa: Earth Monoprints

Art with Alyssa: Earth Monoprints

Celebrate Earth Day by doing an art project at home and participating in local Earth Day events around San Diego. Discussion Points for Teachers/Parents How to take care of the planet—Reduce, . . .

Read more

DIY Pool Noodle Lightsabers

DIY Pool Noodle Lightsabers

May the "fourth" be with you (the force, that is)! Whether you’re celebrating Star Wars Day on May 4 or hosting a Star Wars-themed birthday party, these easy DIY lightsabers are a hit with ki . . .

Read more

Make a Fiesta Banner

Make a Fiesta Banner

Make a festive decoration with this quick and easy DIY project for your Cinco de Mayo celebration at home.Supplies 6 sheets of tissue paper (10” x 20”)Several sheets of black paper or cardstockR . . .

Read more

Art with Alyssa: Marble Painting

Art with Alyssa: Marble Painting

  Marble painting is a great art project that encourages eye-hand coordination and muscle control. It’s fun to experiment with different colors and designs and it’s easy to adapt the project . . .

Read more

Art with Alyssa: DIY Miniature Book

Art with Alyssa: DIY Miniature Book

It’s really fun to craft your own mini books. They make thoughtful gifts for birthdays, Mother’s Day, Father’s Day and more, or a unique place to record your own ideas and quotes. There is lot . . .

Read more

Make and Send a Hug to Loved Ones

Make and Send a Hug to Loved Ones

Don’t you miss hugging people? Here’s a clever DIY hug craft that lets loved ones know they are missed! Whether it’s Mother's Day, Father’s Day, Teacher Appreciation, a birthday or some othe . . .

Read more

Describe Dad Father's Day Craft

Describe Dad Father's Day Craft

Supplies: CardboardDuct tapeAlphabet stickersPencilCraft knifeScissors Here’s how:1.|  Start by deciding how large the letters will be; the ones pictured here are about 11” tall and 7” w . . .

Read more

Be Family Informed – Sign up for our Newsletters below!

Subscribe