quilt square portrait 2392

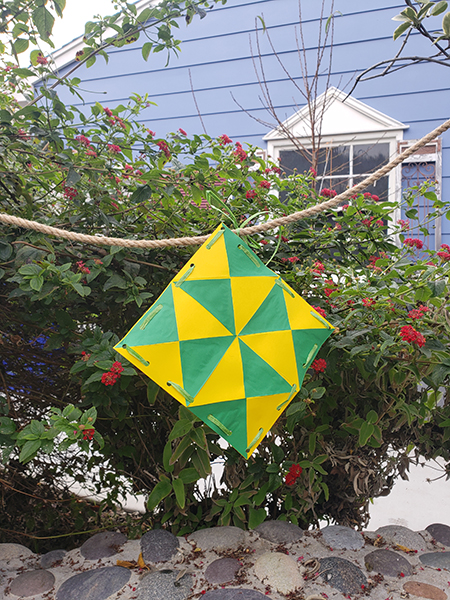
To commemorate Black History Month, do some research as a family on the Underground Railroad and Harriet Tubman. Then construct your own bowtie quilt square with paper.

Discussion for families: Harriet Tubman was perhaps the most famous and successful “conductor” of the Underground Railroad, the intricate network of people, safe houses and trail routes followed by men and women enslaved in the south to make it to freedom in the 1800s. Along the way, trail demarcations such as broken pottery and chalk symbols on barns let Tubman and those who escaped know where to travel or lodge safely. It is even believed that hanging quilt “codes” helped lead the way to safety. There are several quilt patterns thought to have been used, such as the bowtie quilt block pattern, which let travelers know that finer clothes were needed to help them “blend in.” Here’s how to make a bowtie quilt block square out of paper.

Supplies

3 ft. piece of yarn or string (white or color that coordinates with paper)

Scissors

Paper punch

Cardstock or construction paper

White craft glue or hot glue

Glue stick

Directions

  1. Dip two inches of one end of the yarn through glue and remove excess. Allow to dry or harden. This process prevents fraying and makes it easier for less coordinated fingers to thread the yarn through the holes. Note: hot glue works faster and dries harder.

  2. Turn a piece of cardstock vertically (longer sides are on the left and right and shorter sides are on the top and bottom). Fold the paper diagonally so that the right bottom corner touches the left side and what was the bottom edge is now perfectly in line with the left side. Smooth down the diagonal crease and cut the excess paper off the top to create a perfect triangle. 

    quilt E 2392

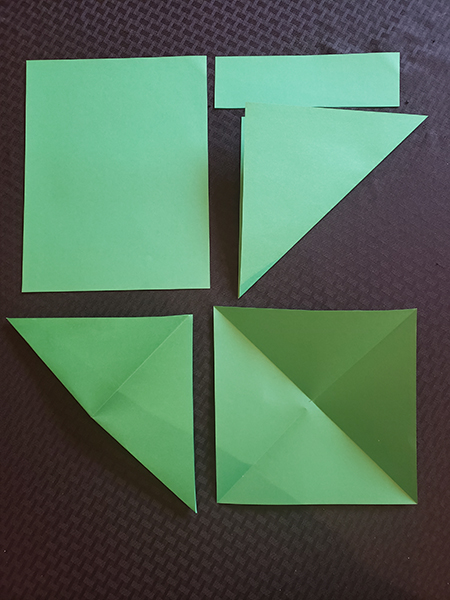
  3. Open the paper to reveal a perfect square. Take the bottom left corner and line it up with the top right corner and crease. Open it up to reveal an “X”. 

  4. Take both bottom corners of the paper and match them to the top corners. Smooth the crease and open.

  5. Turn the paper 90 degrees and repeat matching the corners and smoothing the crease. You should now have a square with a creased cross and a creased “X” connecting all four corners. 

    quilt A 2392

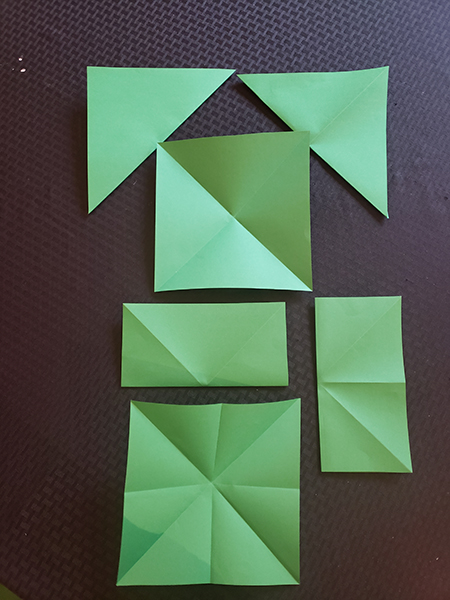
  6. Take one of the four corners, fold to the exact center and crease the fold. Repeat for each corner creating a smaller square. Unfold. 

    quilt B 2392

  7. Repeat this process (steps 2 through 6) with the second colored piece of paper.

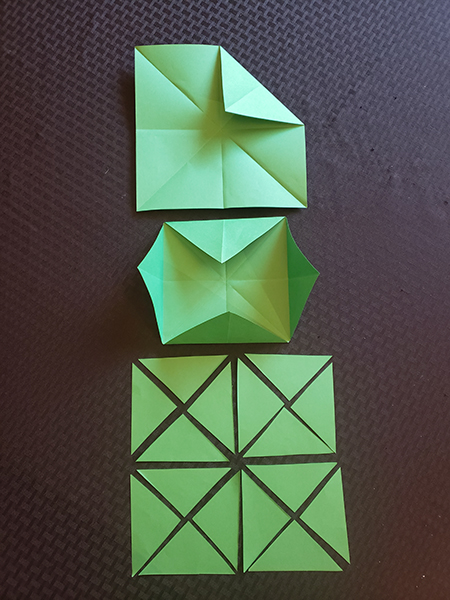
  8. Using ONLY ONE piece of paper, cut along all the fold lines to create small triangles (see photo). You will need half of these for one “quilt” block.

    quilt C 2392

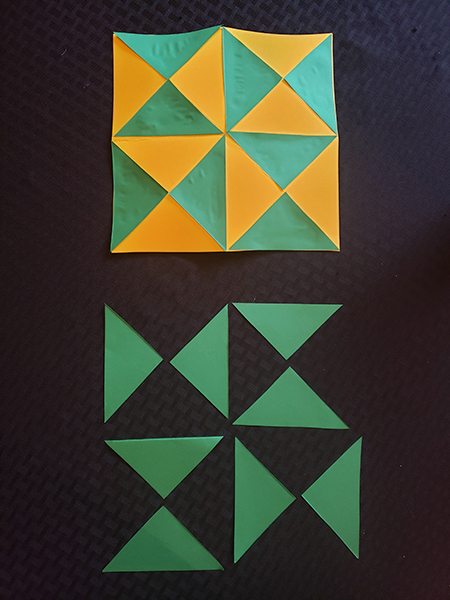
  9. Using the creases on the remaining whole piece of paper as guidelines, glue the triangles down with white glue or a glue stick. Refer to the pattern in photo, if needed.

  10. When dry, punch holes along the edges of each side about one inch apart. Thread the yarn through the holes all along the edge and glue or tie the ends down.

    quilt D 2392

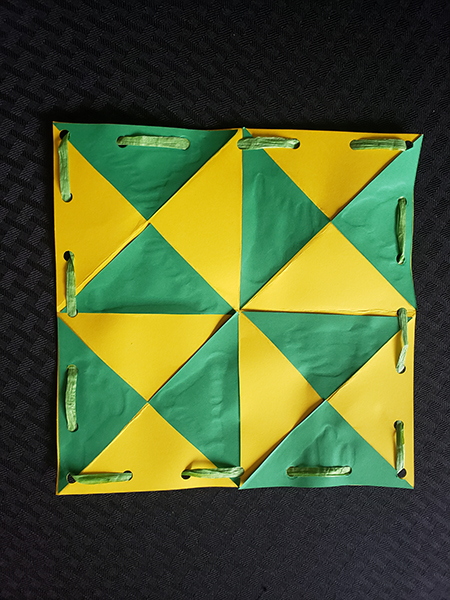
Display as a single quilt square or make several squares in different colors to display as whole “quilt.”

For more designs and their meanings, visit your local library for Barbara Brackman’s book Facts & Fabrications-Unraveling the History of Quilts & Slavery: 8 Projects, 20 Blocks, First-Person Accounts or download for Kindle on Amazon. 

To learn more about the Underground Railroad, visit the Harriet Tubman Underground Railroad National Historic Park website: www.nps.gov/hatu/index.htm.

______________

Emily Dolton is a local artist and mom of two.

Art with Alyssa: Nature Pendants

Art with Alyssa: Nature Pendants

Spring is an excellent time for nature-inspired art projects for kids. This month’s “Art with Alyssa” project provides instructions to make nature pendants, which make wonderful gifts for . . .

Read more

Art with Alyssa: Nature Weaving

Art with Alyssa: Nature Weaving

Supplies Twigs or sticks, 6–12” long Garden clippers Scissors Twine or yarn Variety of grasses, flowers and plants with long stems. (I used buttercup, euryops, geranium, lavender, rosemar . . .

Read more

Art with Alyssa: Nature's Paintbrushes

Art with Alyssa: Nature's Paintbrushes

Create beautiful outdoor art using homemade paintbrushes from plants and items found in nature.Tips for Teachers/ParentsTeach children to respect living plants and only use found or discarded flower . . .

Read more

Art with Alyssa: How to Make a Nature Journal

Art with Alyssa: How to Make a Nature Journal

Creating and maintaining a nature journal is a fun, relaxing and educational activity for children (and adults) that encourages time outdoors and connection with nature. There is no right way to kee . . .

Read more

Art with Alyssa: Recycled Egg Carton Flowers

Art with Alyssa: Recycled Egg Carton Flowers

Turning trash into treasure is not only fun, it’s great for the planet. You’ll love this recycled art project that transforms a paper egg carton into a beautiful bouquet of flowers—perfect for . . .

Read more

Smiling Sun Craft

Smiling Sun Craft

Brighten up a spring or summer day with a smiling sun craft made with colorful yarn and glue. This project also makes a festive Cinco de Mayo decoration. Get creative and make your own unique design . . .

Read more

Art with Alyssa: Earth Monoprints

Art with Alyssa: Earth Monoprints

Celebrate Earth Day by doing an art project at home and participating in local Earth Day events around San Diego. Discussion Points for Teachers/Parents How to take care of the planet—Reduce, . . .

Read more

DIY Pool Noodle Lightsabers

DIY Pool Noodle Lightsabers

May the "fourth" be with you (the force, that is)! Whether you’re celebrating Star Wars Day on May 4 or hosting a Star Wars-themed birthday party, these easy DIY lightsabers are a hit with ki . . .

Read more

Make a Fiesta Banner

Make a Fiesta Banner

Make a festive decoration with this quick and easy DIY project for your Cinco de Mayo celebration at home.Supplies 6 sheets of tissue paper (10” x 20”)Several sheets of black paper or cardstockR . . .

Read more

Mother's Day Mason Jars

Mother's Day Mason Jars

Show mom how much she is appreciated this Mother’s Day with a decorated mason jar full of love! Supplies Empty mason jar with lid Scraps of colored/patterned paper Pieces of ribbon or strin . . .

Read more

Mother's Memory Book

Mother's Memory Book

Make Mom extra happy this Mother's Day with the gift of photos, messages and mementos organized into one handmade book from the kids. Supplies: Kids’ school papers, letters, artwork, cards, etc.2 . . .

Read more

DIY Super Mom Badge for Mom

DIY Super Mom Badge for Mom

Make a Super Mom badge for mom this Mother's Day! SuppliesCupcake linersScraps of paper and/or old book pagesCrepe paper or ribbonsAlphabet stickers or stampsScissors (plain or decorative)Cookie cu . . .

Read more

Art with Alyssa: Marble Painting

Art with Alyssa: Marble Painting

  Marble painting is a great art project that encourages eye-hand coordination and muscle control. It’s fun to experiment with different colors and designs and it’s easy to adapt the project . . .

Read more

Art with Alyssa: DIY Miniature Book

Art with Alyssa: DIY Miniature Book

It’s really fun to craft your own mini books. They make thoughtful gifts for birthdays, Mother’s Day, Father’s Day and more, or a unique place to record your own ideas and quotes. There is lot . . .

Read more

Be Family Informed – Sign up for our Newsletters below!

Subscribe