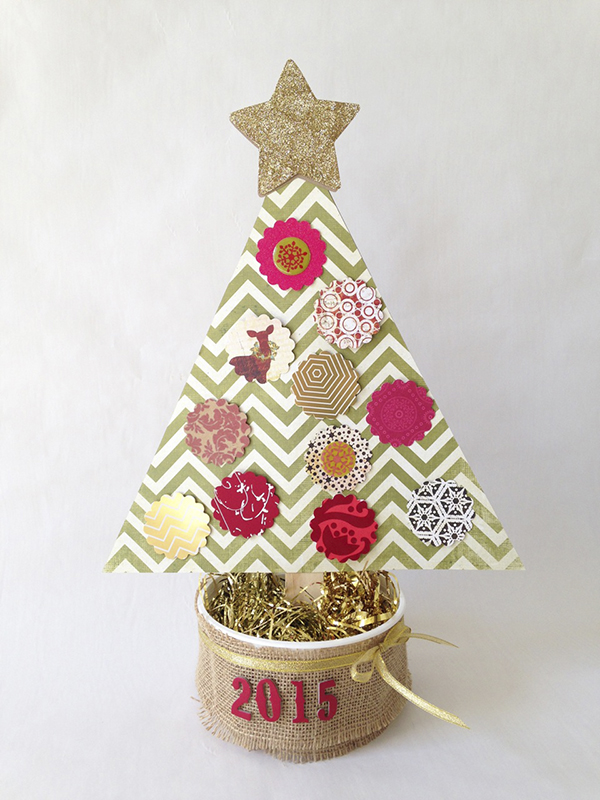
The whole family can help make this cheerful tree to countdown the days to Christmas!

Supplies

  • 2 sheets of heavyweight scrapbooking paper or cardstock (12” x 12”)
  • Scraps of plain and decorative papers
  • Tub of air-dry or modeling clay
  • Paint stir stick or 12” wood ruler
  • Piece of burlap, fabric, felt or paper (about 3” x 12”)
  • Gift shred/grass (optional)
  • 1½” and 2” circle punches or templates
  • Star template (optional)
  • Number stickers or stamps
  • Pencil & scissors
  • Double-sided tape
  • Paper or cellophane tape


Directions

  1. Cut two large triangle “trees” from the scrapbooking paper, drawing them first with a ruler and pencil, if needed.
  2. Use a 1½” circle punch (or a circle template, pencil and scissors) to cut out 11 circles from scraps of plain paper.
  3. Use number stickers or stamps or simply write numbers 1–11 on each of the paper circles.
  4. Use double-sided tape to adhere the numbered circles to the front of one the triangles.
  5. Draw star shapes (or trace a template) onto a scrap of plain paper and onto a scrap of decorative paper and cut them out.
  6. Add the number 12 to the plain star and adhere it to the top of the numbered triangle tree.
  7. Use a 2” circle punch (or a circle template) to make “ornaments.” Cut 11 circles from scraps of decorative paper and set them aside along with the decorative star.
  8. To create the tree trunk, lay the numbered triangle face down and use tape to secure the paint stick (or ruler) to the center of it, leaving 4” extended beyond the bottom of the triangle.
  9. Use double-sided tape to attach the other paper triangle over the stick and back of the first triangle.
  10. Trim a piece of burlap (fabric, felt or paper) to wrap around the container of clay; use tape to secure it.
  11. Add the year to the front of the wrapped tub using number stickers.
  12. Open the tub and carefully insert the wood trunk of the tree down into the center of the clay.
  13. If desired, cover the clay with decorative gift shred/grass.
  14. Place the decorative circle ornaments and star into the tub around the tree trunk and choose a prominent place to display the Christmas countdown tree.
  15. Each day, pick out a pretty ornament and tape it into place on the tree, saving the star for Christmas day!

Christmas tree countdown calendar
More Tips and Ideas

  • Embellish each ornament with pictures of the items in the 12 Days of Christmas song (a partridge, a swan, a golden ring, etc.).
  • Make smaller ornaments (or a bigger tree) to countdown all 25 days to Christmas.
  • Wood paint stir sticks are free at the paint counters of hardware/home improvement stores.
  • The 12” x 12” sheets of scrapbooking paper can be repalced with painted cardboard.
  • Cut the ornaments from fun family photos (instead of paper).
  • If circle punches or templates aren’t available, trace around bottle caps.
  • Cover the paint stick/ruler with burlap twine or printed paper.
  • Cut the ornaments from old greeting cards or festive magazine pictures.
  • Decorate the ornaments even more with stickers, glitter or sequins.
  • Make gift shred/grass by cutting skinny strips from paper, gift wrap or old book pages.
  • Make a winter themed countdown tree with silver and blue colors and snowflake ornaments.
  • Craft a natural themed countdown with paper pinecone and flower ornaments or make it a “treats” theme with paper cookies, candies and cupcakes.
  • On each ornament write a fun Christmas activity to participate in every day.
  • Make a new tree each year and display them together for fantastic holiday décor.
  • Create the entire tree, trunk and base from wood and pin on ornaments for a countdown that can be re-used every year.
  • Make smaller versions (using yogurt cups as bases) and use them as table place cards and/or treat cups.
  • If a tub of clay is not available, use an empty food tub or tissue box and secure the tree trunk with lots of tape and add rocks or dried beans to weigh it down.

.


Pamela Maxwell is an artist, author and mother of two growing boys. Photos by Pamela Maxwell.

Art with Alyssa: How to Make Beautiful Snowflakes with Coffee Filters

Art with Alyssa: How to Make Beautiful Snowflakes with Coffee Filters

This winter, gather the kids to make beautiful, colorful snowflakes using coffee filters and water-soluble markers. This craft project promotes creativity and a sense of intrigue as kids wait to see . . .

Read more

Art with Alyssa: DIY Miniature Book

Art with Alyssa: DIY Miniature Book

It’s really fun to craft your own mini books. They make thoughtful gifts for birthdays, Mother’s Day, Father’s Day and more, or a unique place to record your own ideas and quotes. There is lot . . .

Read more

Craft a Paper Carousel

Craft a Paper Carousel

This project is inspired by the beautiful historic carousel that sits majestically in the northeast corner of San Diego’s Balboa Park. Whether you’re planning a whimsical birthday party, celebra . . .

Read more

Art with Alyssa: “Stained Glass” Tissue Paper Project

Art with Alyssa: “Stained Glass” Tissue Paper Project

This art project is inspired by the works of Justin Sterling, a Black artist who had an art installation at the San Diego Museum of Art in Balboa Park in 2023 called Chapel of the Rocks. L . . .

Read more

Raindrop Drip Painting

Raindrop Drip Painting

We don’t know many kids who can resist jumping in rain puddles. And since we don’t get rain puddles too often in San Diego, it’s a particularly unique and special activity! Why not commemorate . . .

Read more

Art with Alyssa: Paper Bag Memory Books

Art with Alyssa: Paper Bag Memory Books

Create a unique memory book to save special keepsakes and photos—and to reminisce about all the fun you had this summer!Discussion Points for Parents/Teachers Talk about your favorite summer me . . .

Read more

Ice Painting

Ice Painting

Creating art with frozen paint cubes (ice painting) is a super fun summertime or warm-weather activity. It’s also a great party activity for a Frozen-themed birthday party (or any winter-themed ce . . .

Read more

Chinese New Year Lion Lantern

Chinese New Year Lion Lantern

Light up a Chinese New Year celebration with this lively lantern -- a perfect project to do at home with the kids!SuppliesRed paper lanternSheet of red tissue paper1 sheet of office paperScraps of c . . .

Read more

Art with Alyssa: Story Collage Inspired by Faith Ringgold

Art with Alyssa: Story Collage Inspired by Faith Ringgold

Teach children about Black history by studying famous African-American artists and creating art inspired by their work. Here is information about Faith Ringgold, who is best known for her story quil . . .

Read more

Art with Alyssa: Tint and Shade Hearts

Art with Alyssa: Tint and Shade Hearts

Learn tinting and shading with this fun and educational art project that is great for Valentine’s Day or anytime of the year. It works best with oil pastels, but chalk pastel would work as well. D . . .

Read more

Art with Alyssa: Kente Cloth Paper Weaving for Black History Month

Art with Alyssa: Kente Cloth Paper Weaving for Black History Month

Looking for a fun and educational Black History Month art project to do with kids? Consider this paper weaving craft inspired by traditional Kente cloth of Ghana. Learn about the cultural significan . . .

Read more

Underground Railroad Quilt Square Craft

Underground Railroad Quilt Square Craft

To commemorate Black History Month, do some research as a family on the Underground Railroad and Harriet Tubman. Then construct your own bowtie quilt square with paper. Discussion for families: Har . . .

Read more

Art with Alyssa: African Maasai Family

Art with Alyssa: African Maasai Family

Celebrate diversity and families with this easy project that utilizes fabric scraps and materials you may already have. Consider framing the finished artwork and gifting it to a family member. The p . . .

Read more

Art with Alyssa: Pop Art Hearts

Art with Alyssa: Pop Art Hearts

A fun art project to do with kids on Valentine’s Day or anytime of the year.Pop Art artists of the 1960s, such as Andy Warhol, used everyday objects as inspiration for art. In the 1980s another grou . . .

Read more

Be Family Informed – Sign up for our Newsletters below!

Subscribe