IMG 0463

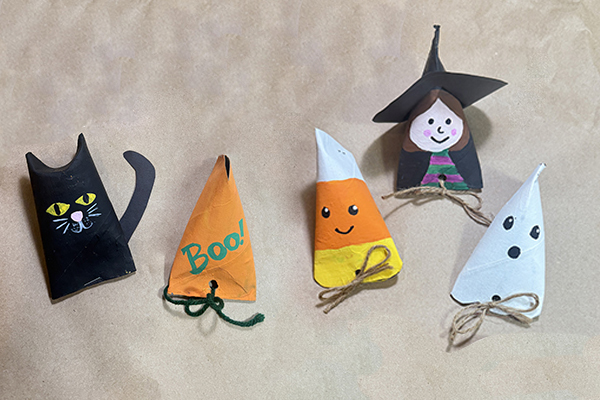
Looking for a fun and sustainable project to do with the kids this Halloween? These adorable treat boxes are made from recycled paper towel or toilet paper cardboard tubes. They can be filled with small, wrapped candies, trinkets or stickers and given to friends, neighbors and classmates as a unique and thoughtful gift or party favor! Plan ahead so there is time for the paint to dry.


IMG 0478

Supplies

  • Something to cover workspace
  • Cardboard tubes (paper towel or toilet paper) 
  • Scissors
  • Tempera or acrylic paint in colors that match the characters you want to make (orange, yellow, white, pink, green, black, skin tone, etc.)
  • Pencil
  • Paintbrush
  • Water cup
  • Colored pencils or paint pens
  • Hole punch 
  • Stapler
  • Ribbon, raffia, yarn or twine
  • Candy, mini toys or stickers to fill containers
  • Black construction paper or cardstock (if making witches and cats)
  • Optional: googly eyes and glue


IMG 0252

Directions

  1. Cover your workspace with an opened large paper bag, placemat or plastic cloth.
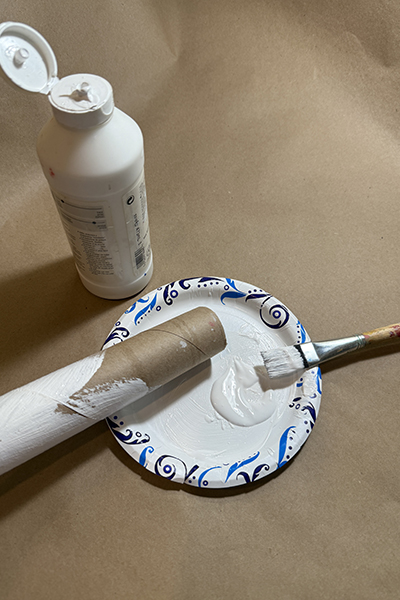
  2. Pro tip: For white and orange treat boxes, paint tubes white first and allow to dry.
  3. If using paper towel tubes, cut each one into sections about 4” long. 
  4. Continue below with directions for each “character” you want to make. Then return to the next step (#5)
  5. Once dry, place a few candies, stickers or small toys inside. To close the decorated tube with treats inside, pinch the bottom and staple closed OR punch a hole and secure with ribbon, twine or raffia (the ribbon method makes treat boxes reusable). 


IMG 0467

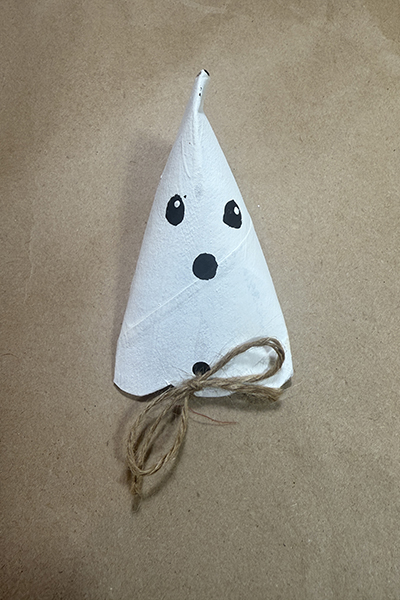
GHOST TREAT BOX: Paint the tube white and allow to dry; if using brown cardboard tubes, ghosts look better when painted with two coats of white (drying in between coats). Pinch one end of the tube and staple shut. For a scalloped bottom edge, pinch it in the opposite direction as the top, then draw and cut curves (see photo). Draw eyes and mouth or adhere googly eyes. Continue with step #5 above.


IMG 0252

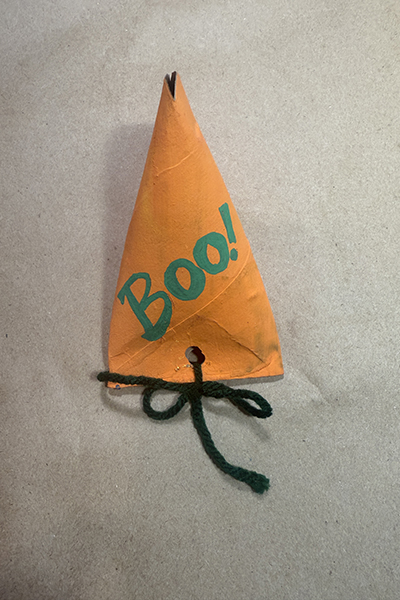
“BOO!” TREAT BOX: Paint the tube orange and allow to dry.* Pinch one end of the tube and staple closed. Pinch the bottom in the opposite direction as the top, then write “Boo!” on the front. Continue with step #5 above.


IMG 0465

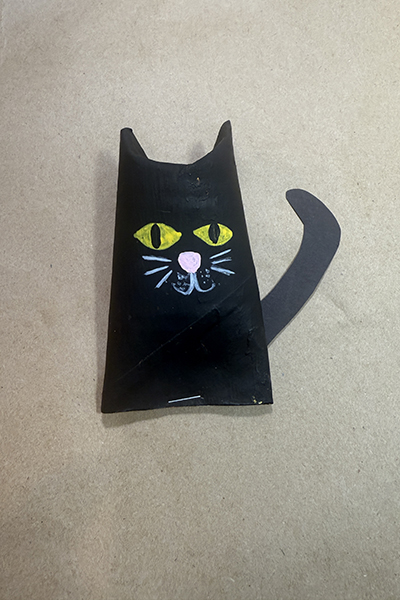
CAT: Paint tube black and allow to dry.* Push top edges of tube down to create ears (see photo); they should stay down without staples. Cut a tail from black paper or cardstock and glue or tape to the back. Pinch bottom in same direction as top; then draw face with paint pens or colored pencils. Continue with step #5 above.


IMG 0468

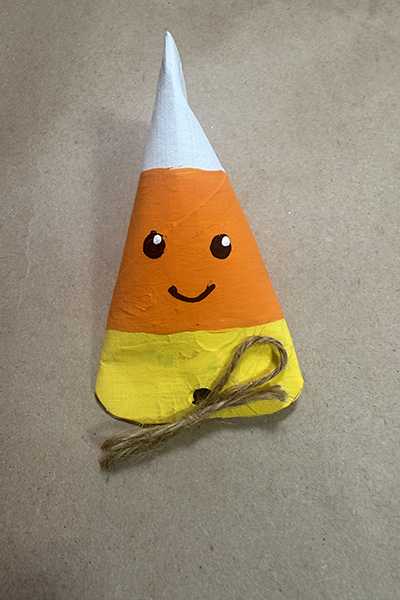
CANDY CORN: Lightly draw pencil lines to divide the tube into three sections. Paint bottom section yellow, the middle orange, and the top white. Allow to dry.* Pinch the top of the tube and staple closed. Pinch the bottom of the tube in the opposite direction and add face details. Optional: Round corners of points on bottom. Continue with step #5 above.


IMG 0470

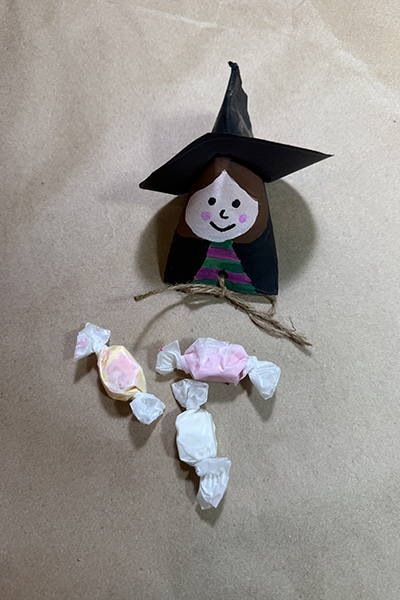
WITCH: Staple one end of the tube closed. Working on a side with a point facing you, lightly draw a face (circle) in pencil and hair in the middle third of the tube. Add a long triangle that goes from under the “chin” to the bottom of the tube for the dress (add stripes if you wish). Paint the round shape (face) above the triangle. (See partially painted witch below.) Paint the dress solid or in stripes. Paint the rest of the tube black and allow to dry. Once dry, add face details with paint pens or colored pencils. 

To make the hat brim, trace and cut a 4” circle out of black paper. Fold the circle in half and cut a slit in the middle about ¼” from the edge. Slide the circle over the top of the tube and glue in place. Continue with step #5 above.


IMG 0252

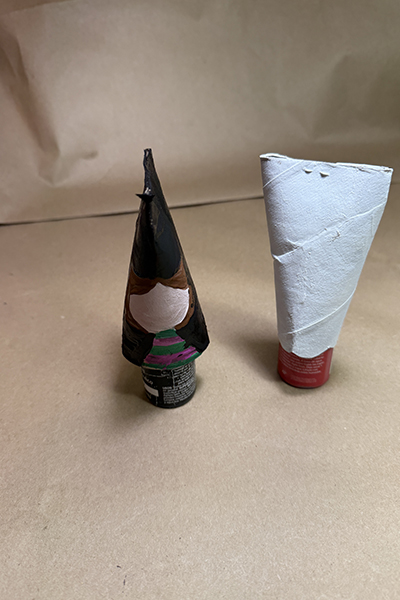
Pro tip: To promote even drying, put painted tubes over paint bottles (or other small containers). 


Alyssa Navapanich is an award-winning art educator who teaches art to elementary school kids in East San Diego County.


Homemade Holiday: How to Make Beautiful Salt Dough Ornaments 

Homemade Holiday: How to Make Beautiful Salt Dough Ornaments 

One of my favorite childhood memories is decorating my grandma’s tree because I got to see ornaments my father, aunt and uncle made as children. I hope my nostalgia for homemade ornaments is inher . . .

Read more

Star of David Art Project

Star of David Art Project

Supplies One 12” x 12” canvas  Paintbrush Blue paint in 2-3 shades (the photo shows dark blue, light blue and turquoise)  White paint  Silver paint Water cup Old credit car . . .

Read more

Art with Alyssa: Poinsettia Yarn Painting

Art with Alyssa: Poinsettia Yarn Painting

Create a yarn painting featuring the season's favorite festive flower, the poinsettia. Find books about poinsettias at your local library to learn more about them. Did you know? Poinsettias are nat . . .

Read more

Twig Christmas Tree Decorations

Twig Christmas Tree Decorations

This is a fun Christmas craft for families that offers plenty of room for imagination and creativity! Use mini strands of tinsel to make glittery trees or twine for a more rustic look. Smaller trees . . .

Read more

DIY Christmas Advent Calendars

DIY Christmas Advent Calendars

      Everyone loves advent calendars that reveal a daily surprise—it's also really fun to make them! Start your own family traditions in the days leading up to Christmas (or any cel . . .

Read more

Hanukkah Place Card Holders

Hanukkah Place Card Holders

These happy Hanukkah bags serve as place card (or utensil) holders for the holiday table and make festive party favors!Supplies Small, flat brown (or white) paper bagsScraps of blue, white, silver p . . .

Read more

Art with Alyssa: Christmas Village Putz Houses 

Art with Alyssa: Christmas Village Putz Houses 

Get the whole family involved in creating vintage Christmas village houses using cardboard, glitter and a whole lot of creativity!  Vintage putz (or glitter houses) originated in Europe in the . . .

Read more

Art with Alyssa: Dreidel Garland

Art with Alyssa: Dreidel Garland

Get the kids involved in decorating for Hanukkah by making this festive dreidel garland by local art teacher, Alyssa Navapanich. There is lots of room for creativity using just a few art supplies. F . . .

Read more

12-Day Christmas Countdown

12-Day Christmas Countdown

The whole family can help make this cheerful tree to countdown the days to Christmas! Supplies 2 sheets of heavyweight scrapbooking paper or cardstock (12” x 12”) Scraps of plain and decorativ . . .

Read more

Art with Alyssa: DIY Menorah Craft

Art with Alyssa: DIY Menorah Craft

Get the kids involved in decorating for Hanukkah by designing a menorah with wooden blocks. Discussion Points for Parents/Teachers Talk about Hanukkah family traditions. Talk about the symbols . . .

Read more

Art with Alyssa: Make Beautiful Snowflakes

Art with Alyssa: Make Beautiful Snowflakes

This winter, gather the kids to make beautiful, colorful snowflakes using coffee filters and water-soluble markers. This craft project promotes creativity and a sense of intrigue as kids wait to see . . .

Read more

Hanukkah Countdown Calendar

Hanukkah Countdown Calendar

Count down to Hanukkah with this fun and easy craft—a menorah made with paper towel tubes and a few decorative supplies. Put a toy into eight of the tube “candles” to be unwrapped each night. . . .

Read more

Fun Winter Craft: Make an Adorable Sock Snowman

Fun Winter Craft: Make an Adorable Sock Snowman

This cute sock snowman craft is easy enough to make with the kids using items you probably already have at home: socks, buttons and scrap fabric or ribbon. What a fun activity to do as a family whil . . .

Read more

New Year's Eve DIY Noisemakers

New Year's Eve DIY Noisemakers

Ring in the New Year with fun and festive DIY noisemakers (resolutions optional).SUPPLIES Empty aluminum soda or juice cans Pennies, small rocks, dried beans and/or jingle bells Leftover gift w . . .

Read more

Be Family Informed – Sign up for our Newsletters below!

Subscribe