freaky fruit 1234

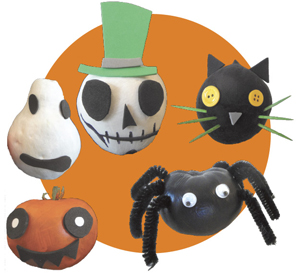
Why should pumpkins get all the attention at Halloween? Share the spotlight by giving a few pieces of fruit the spooky treatment, too!

Supplies:

Fresh or fake fruit
Craft paint in desired colors
Scraps of colored paper, felt or craft foam
Tacky glue or adhesive dots
Chenille stems, googly eyes, buttons (options)
Paintbrush
Scissors


••••••••••••••••••••••••••••••••••••••••••••••••••••

Here's How:

1.|  Cover the work area, and then use a brush to paint the fruit (if desired) — white for ghosts and skulls, black for bats, cats and spiders, etc.

2.|  Allow the paint to dry completely. Apply a second coat of paint if needed.

3.|  While the paint dries, use scissors to cut eyes, ears and other features from paper, felt or foam.

4.|  Attach the shapes to the fruit with glue or adhesive dots.

5.|  To finish add extras like chenille stems, googly eyes, buttons, sequins or pom-poms.

6.|  The freaky friends are now ready to scare; display them proudly alongside your pumpkins! Of course, fresh fruit won’t last long, so be sure to throw them out before they get too gross. Or if you dare, turn them into a creepy science experiment and watch them decompose a little more every day.

••••••••••••••••••••••••••••••••••••••••••••••••••••••

More Ideas:

• Use fake fruit to create decorations that will last year after year.

• Straight pins are another easy way to attach the features, but be sure to remove them from the fruit before disposal to prevent an animal from accidentally eating them.

• Try using veggies, too! Leave a green pepper unpainted and turn him into Frankenstein’s monster.

• Sprinkle glitter into the wet paint.

• Decorate the fruit with only found/natural objects such as twigs and seeds.

••••••••••••••••••••••••••••••••••••••••••••••••••••••
Pamela Maxwell is an artist, author and mother of two quickly growing boys. Her craft and scrapbooking projects have appeared in numerous books and magazines. She is currently working on a kids’ craft book and a line of kids’ party supplies. Photo by Pamela Maxwell.

Published: September 19, 2012

Art with Alyssa: Shamrock Watercolor Banner

Art with Alyssa: Shamrock Watercolor Banner

Here’s a St. Patrick’s Day art project the whole family can get excited about! Make beautiful watercolor designs and cut them into shamrock shapes to make a decorative banner or cards for loved . . .

Read more

Art with Alyssa: How to Make a Leprechaun Trap for St. Patrick's Day

Art with Alyssa: How to Make a Leprechaun Trap for St. Patrick's Day

Have fun this St. Patrick’s Day making leprechaun traps with the kids. Start by reading a related story, such as How to Catch a Leprechaun by Adam Wallace, for inspiration. Then use imagination an . . .

Read more

Lucky Leprechauns

Lucky Leprechauns

This St. Patrick’s Day create some cute leprechauns from plastic eggs and craft scraps.SuppliesGreen plastic Easter eggsScraps of craft foam, felt or paperSmall, miscellaneous craft items (ribbon, . . .

Read more

Swirly Shamrocks

Swirly Shamrocks

Craft this cute shamrock for St. Paddy’s Day with green paper, glue and a little glitter. You'll Need:4 sheets of 8 1/2 x 11 green cardstock or construction paperPencilRulerScissorsWhite glueTr . . .

Read more

Art with Alyssa: Nature Pendants

Art with Alyssa: Nature Pendants

Spring is an excellent time for nature-inspired art projects for kids. This month’s “Art with Alyssa” project provides instructions to make nature pendants, which make wonderful gifts for . . .

Read more

Art with Alyssa: How to Make a Nature Journal

Art with Alyssa: How to Make a Nature Journal

Creating and maintaining a nature journal is a fun, relaxing and educational activity for children (and adults) that encourages time outdoors and connection with nature. There is no right way to kee . . .

Read more

Art with Alyssa: Nature Weaving

Art with Alyssa: Nature Weaving

Supplies Twigs or sticks, 6–12” long Garden clippers Scissors Twine or yarn Variety of grasses, flowers and plants with long stems. (I used buttercup, euryops, geranium, lavender, rosemar . . .

Read more

Spring Bunny Cup

Spring Bunny Cup

This spring, craft a cute bunny cup to hold Easter treats! You'll Need:Paper cupScraps of pretty paper12” length of crepe paper streamerChenille stemGlitter3 buttons3 pom-pomsWhite gluePencilMark . . .

Read more

Burlap Bunny Treat Bags

Burlap Bunny Treat Bags

These cute burlap bunnies are fun to create and fill with treats, making them perfect for friends or classmates! Kids can participate in assembling or decorating these treat filled easter decoration . . .

Read more

Easter Egg Decor

Easter Egg Decor

Decorate real eggs this Easter to look like sweet treats such as cupcakes, lollipops and wrapped candies. SuppliesEggsEgg decorating kit/dye of choiceSmall pieces of colored and clear cellophaneBake . . .

Read more

Art with Alyssa: Recycled Egg Carton Flowers

Art with Alyssa: Recycled Egg Carton Flowers

Turning trash into treasure is not only fun, it’s great for the planet. You’ll love this recycled art project that transforms a paper egg carton into a beautiful bouquet of flowers—perfect for . . .

Read more

Art with Alyssa: Recycled Easter “Eggs”

Art with Alyssa: Recycled Easter “Eggs”

Combining Easter fun and environmental awareness in honor of Earth Day is a win-win in our eyes. Here are instructions to make DIY Easter “eggs”— a fun and clever way to wrap and hide treats f . . .

Read more

Art with Alyssa: DIY Easter Treat Baskets

Art with Alyssa: DIY Easter Treat Baskets

Make miniature baskets using simple materials like paper plates, pipe cleaners and markers; then deliver springtime treats to neighbors and friends! Supplies Paper plates, one per basket Marker . . .

Read more

Art with Alyssa — Bunch of Bunnies

Art with Alyssa — Bunch of Bunnies

This cute bunny craft is a perfect springtime or Easter activity for the kids to do at home, school or with friends. You may already have some of these supplies around the house. SuppliesOne short . . .

Read more

Be Family Informed – Sign up for our Newsletters below!

Subscribe