Use air-dry clay and a little creativity to make holiday gifts such as ornaments, necklaces, pins, key chains, magnets and more!
Supplies:
Air-dry clay
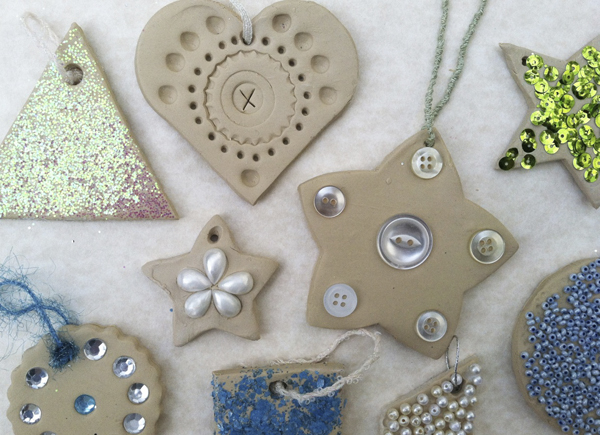
Small embellishments—beads, sequins, glitter, buttons
Cookie cutters
Waxed or parchment paper
Rolling pin
Drinking straw
Pencil or toothpick (optional)
Short pieces of ribbon or string
Pin backs, magnets, clasps (optional)
Here’s how:
1.| First, cover the workspace with a sheet of waxed paper or parchment paper (the clay pieces will be easier to remove).
2.| Knead some clay and then use a rolling pin (or smooth glass) to roll it out flat until it’s about 1/4” thick.
3.| Use a cookie cutter to cut out a shape. (Be sure to put the excess clay back in its container before it starts to dry out.)
4.| Next, use a drinking straw to punch a hole for hanging at the top of the shape.
5.| Now, decorate the shape by pressing pretty embellishments like beads or sequins into it—randomly or in a pattern. It can also be decorated by pressing designs onto it with a pencil or other household items.
6.| Repeat the last four steps until as many pieces as desired are made.
7.| Allow the clay to dry at least 24 hours and then add any findings to finish it off: Tie ribbons on for ornaments, glue pin backs on for brooches, glue magnets on the backs or add keychain rings.
8.| Gift wrap the pretty pieces and they are ready to give to friends, family and teachers for Hanukkah, Christmas, Kwanzaa or any winter occasion!
More ideas:
• Try cookie cutters in the shape of letters, animals or other objects.
• For a more free-form look, flatten and mold the shapes by hand instead of rolling and cutting them.
• Spell out names or greetings with several decorated clay letters strung together.
• Make and decorate larger shapes to create pretty plaques.
• Add pictures or numbers to clay shapes, and then hang them one day at a time as a unique advent calendar or countdown.
• Try using colored clay as well.
• Press dry rubber stamps or toys into the clay for interesting effects.
• Cut out small paper stencils to lay over the shapes before applying glitter.
• Embellishments can also be glued onto dry clay.
• Make all-natural versions by using only seeds, pebbles and other outdoor finds to decorate the clay.
• Add beads to the hanging ribbon.
• Tie these onto wrapped gifts as a special embellishment.
• Air-dry clay can also be painted with craft paints.
• Make these in the spring using flower shapes and pastel colors
--------------------------
Pamela Maxwell is an artist, author and mother of two growing boys. Her craft and scrapbooking projects have appeared in numerous books and magazines. Photos by Pamela Maxwell.
Published: December 2013


