cardboard nicho D 1993

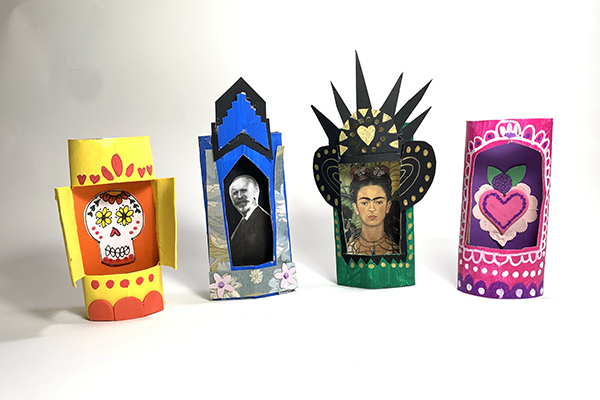
Celebrate Mexico’s Día de los Muertos (Day of the Dead) by creating a personal nicho. A nicho is a small shadow box that features a scene, images and items that are special to the person who creates it (photos of a loved one, a piece of jewelry, a mini toy, etc.). Many ofrendas (Day of the Dead altars) include nichos as a way of paying tribute to loved ones who have passed away. Below are two ways to make nichos using recycled materials: the first project uses empty cardboard toilet paper tubes and the second uses a recycled mint tin.

Discussion Points for Teachers/Parents

  • Talk about things you love. What might you want to put in a special place of honor?
  • Discuss recycled materials and using found objects to create art, collage and color.

 
Supplies

  • Cardboard toilet paper tubes
  • Small cup of water 
  • Tempera or acrylic paints (assorted colors)
  • Paint brushes
  • Scissors
  • Colored paper or cardstock
  • Markers or paint markers
  • Things to decorate with: glitter glue, small plastic gems, sequins, stickers, paper or foam shapes
  • An image to put inside your nicho—photo of a loved one, image of a famous artist, image of a sugar skull, a drawing or heart collage—it’s up to you! Image size: approx. 2” wide x 3½” long

 
Directions

  • Cover workspace with a large paper bag or plastic cloth.
  • Paint cardboard tubes with preferred bright colors and allow to dry. Pro tip: If you paint the tube white first, the colors will be a little brighter. 
  • Decide if you want “doors” to the opening, then proceed one of two ways: 

If no doors: To cut the window, gently fold the tube in half and cut a rectangle shape that is approximately 1”x 2”. Optional: Alter the shape of the opening by rounding the top cut or making it pointy. 

cardboard nicho A 1993    cardboard nicho C 1993
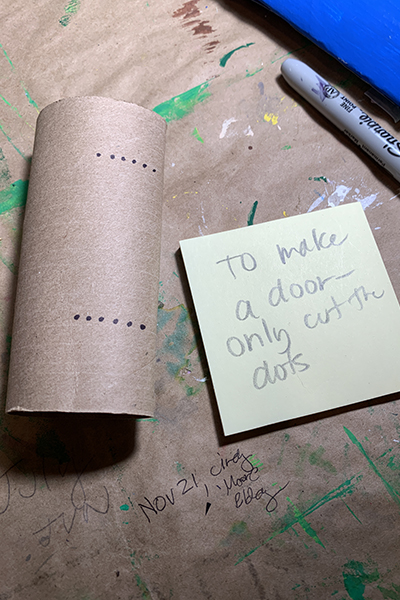
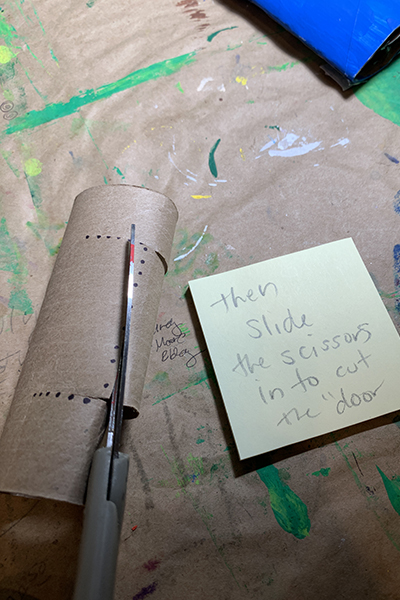
If you want “doors”: Cut a parallel top and bottom slit for the intended opening, then slip your scissors into the slot and cut down the center, leaving doors attached on each side. Fold back the doors to open. Be sure to paint the inside of the doors and allow to dry. 

  • Decorate the outside of the tube using whatever decorative items you chose: cut paper shapes, stickers, sequins, markers, etc. 
  • For the image, cut a piece of paper or cardstock that will fit inside the tube, about 2” wide and 3½” long. Glue the photo or drawing to the inside center of the tube. Adjust the image by sliding the paper so that the image can be seen through the opening.

 __________

Alyssa Navapanich is an award-winning art educator who teaches art to elementary school kids in East San Diego County.
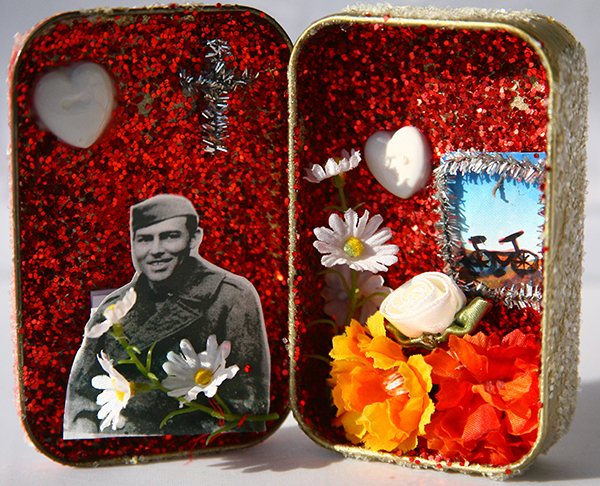
__________

nicho red glitter 1993


Supplies

  • Mint tin or jewelry-size cardboard box
  • Scissors
  • White glue
  • Paintbrush
  • Small paper cup
  • Special items to put inside (small toy, photos of a loved one, a drawing, etc.)  
  • Decorative collage items such as buttons, beads, silk flowers, glitter, colorful paper scraps, lace or Washi tape


Directions

  • Pour a small amount of white glue into a paper cup. Using a paintbrush, paint the glue on the outside of the box and sprinkle with glitter.
  • Once dry, repeat step one for the interior of the box if desired (and allow to dry completely), or line with Washi tape.
  • Use glue to adhere flat collage items (paper scraps, lace and photos) to the interior.  
  • Glue chosen small objects (flowers, toy, jewelry) inside the box to create your display. Overlap with flat items, if you wish.
  • Glue desired decorative items (beads, lace) onto the outer edges or corners of the box.
  • Once it dries completely, put it in a special place in your home. 


Sugar Skull Mask
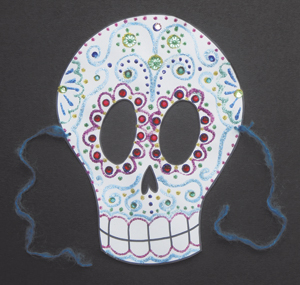
Learn how to make a “sugar skull” mask with white cardstock here.


Alyssa Navapanich is an award-winning art educator who teaches art to elementary school kids in East County.


How to Make a Campfire Crown

How to Make a Campfire Crown

Nothing says camping like a gooey s’mores goodness, so it’s only fitting that kings and queens of the campfire wear s’mores-themed crowns. Here are instructions to make campfire crowns for you . . .

Read more

Smiling Sun Craft

Smiling Sun Craft

Brighten up a spring or summer day with a smiling sun craft made with colorful yarn and glue. This project also makes a festive Cinco de Mayo decoration. Get creative and make your own unique design . . .

Read more

DIY Kiddie Car Wash

DIY Kiddie Car Wash

This fun, do-it-yourself kiddie car wash keeps kids and their ride-on toys cool and clean. Add a spray hose, mild dish detergent and a bubble gun for hours of outdoor playtime. Total cost of materia . . .

Read more

Craft a Paper Carousel

Craft a Paper Carousel

This project is inspired by the beautiful historic carousel that sits majestically in the northeast corner of San Diego’s Balboa Park. Whether you’re planning a whimsical birthday party, celebra . . .

Read more

Ice Painting

Ice Painting

Creating art with frozen paint cubes (ice painting) is a super fun summertime or warm-weather activity. It’s also a great party activity for a Frozen-themed birthday party (or any winter-themed ce . . .

Read more

DIY Pool Noodle Lightsabers

DIY Pool Noodle Lightsabers

May the "fourth" be with you (the force, that is)! Whether you’re celebrating Star Wars Day on May 4 or hosting a Star Wars-themed birthday party, these easy DIY lightsabers are a hit with ki . . .

Read more

Art with Alyssa: Nature Pendants

Art with Alyssa: Nature Pendants

Spring is an excellent time for nature-inspired art projects for kids. This month’s “Art with Alyssa” project provides instructions to make nature pendants, which make wonderful gifts for . . .

Read more

Art with Alyssa: DIY Miniature Book

Art with Alyssa: DIY Miniature Book

It’s really fun to craft your own mini books. They make thoughtful gifts for birthdays, Mother’s Day, Father’s Day and more, or a unique place to record your own ideas and quotes. There is lot . . .

Read more

Art with Alyssa: Marble Painting

Art with Alyssa: Marble Painting

  Marble painting is a great art project that encourages eye-hand coordination and muscle control. It’s fun to experiment with different colors and designs and it’s easy to adapt the project . . .

Read more

Art with Alyssa: Nature Weaving

Art with Alyssa: Nature Weaving

Supplies Twigs or sticks, 6–12” long Garden clippers Scissors Twine or yarn Variety of grasses, flowers and plants with long stems. (I used buttercup, euryops, geranium, lavender, rosemar . . .

Read more

Art with Alyssa: How to Make a Nature Journal

Art with Alyssa: How to Make a Nature Journal

Creating and maintaining a nature journal is a fun, relaxing and educational activity for children (and adults) that encourages time outdoors and connection with nature. There is no right way to kee . . .

Read more

DIY Instruments for Kids

DIY Instruments for Kids

Get creative and have a festive backyard parade with these beautiful homemade musical instruments! Local artist Emily Dolton shares step-by-step instructions on how to make a Melon Maraca, Citrus Dr . . .

Read more

Art with Alyssa: DIY Lorax Puppets & Theater

Art with Alyssa: DIY Lorax Puppets & Theater

Inspired by Dr. Seuss’ lovable and courageous storybook character, craft your own Lorax stick puppets and puppet theater. This fun project is a great springboard for conversation with kids about t . . .

Read more

Art with Alyssa: Recycled Egg Carton Flowers

Art with Alyssa: Recycled Egg Carton Flowers

Turning trash into treasure is not only fun, it’s great for the planet. You’ll love this recycled art project that transforms a paper egg carton into a beautiful bouquet of flowers—perfect for . . .

Read more

Be Family Informed – Sign up for our Newsletters below!

Subscribe