hug 2329

Don’t you miss hugging people? Here’s a clever DIY hug craft that lets loved ones know they are missed! Whether it’s Mother's Day, Father’s Day, Teacher Appreciation, a birthday or some other celebration, help kids make an adorable, personalized hug to send in the mail. The recipient will be thrilled!

Supplies

4-6 ft. craft paper (aka butcher paper) from roll or printer paper*

Pencil

Crayons, watercolors or tempera paints

Directions

  1. Ensure the floor is free of dust and water. 
  2. Roll out enough paper to fit your child's outstretched arms. 
  3. Have your child lay down so that his chest, arms and head are on the paper, face up, with arms and fingers spread wide.
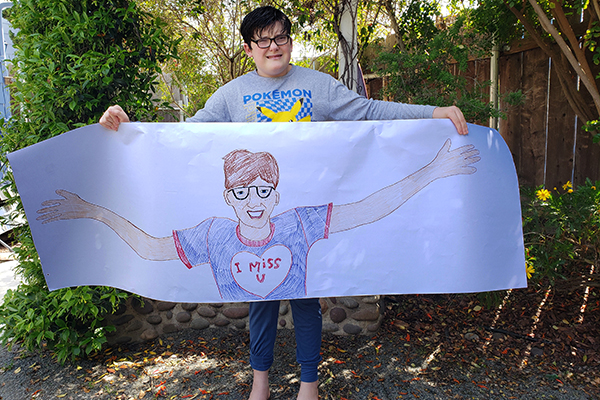
  4. Use a pencil to trace your child's upper torso, arms, hands and head. 
  5. Touch up any squiggly or inaccurate lines. Have your child draw his facial features, clothes, jewelry, glasses and any distinguishing features such as dimples and freckles. Make it personal because your loved one is missing the things that make him unique! 
  6. Create space for a personal message in the center of the chest by drawing a large heart or tracing a plate. Have the child write a heartfelt note to the person they’re sending the hug to.
  7. Color or paint the portrait. Once dry, cut it out, following the outline of the portrait.
  8. Fold the image until it fits inside a manila envelope.**
  9. Be sure to write “open carefully” on the exterior of the envelope.

*If using printer paper:

Needed: 12-15 pieces of printer paper and giftwrapping tape

  1. Lay the paper out, landscape-style, three pieces high and five pieces wide. 
  2. Tape the pieces together with clear, giftwrapping tape, the full length and width of each piece. 
  3. Flip the entire paper over so that the tape side is touching the floor. Your paper should now be 25.5 inches tall and 55 inches wide. 
  4. Add more paper if needed, depending on the size of your child. 
  5. Continue project as instructed above.

**Mail your hug portrait:

Place the folded portrait in a manila envelope. If you don't have one, the U.S. Postal Service offers free priority mail envelopes which also work. Visit www.usps.com and follow the instructions to print postage and/or order free shipping supplies. 

Watch our how-to video, complete with expert tips on how to draw symmetrical facial features!

Emily is a local artist and mom of two boys.

–––––––––

How To Train Your Dragon Movie Activity Kit

How To Train Your Dragon Movie Activity Kit

Set on the rugged, windswept island of Berk, the movie How to Train Your Dragon follows Hiccup, a clever but underestimated teen who doesn’t quite fit in with his fellow Viking dragon-slayers. When . . .

Read more

Art with Alyssa: Nature Pendants

Art with Alyssa: Nature Pendants

Spring is an excellent time for nature-inspired art projects for kids. This month’s “Art with Alyssa” project provides instructions to make nature pendants, which make wonderful gifts for . . .

Read more

Art with Alyssa: Nature Weaving

Art with Alyssa: Nature Weaving

Supplies Twigs or sticks, 6–12” long Garden clippers Scissors Twine or yarn Variety of grasses, flowers and plants with long stems. (I used buttercup, euryops, geranium, lavender, rosemar . . .

Read more

Art with Alyssa: Nature's Paintbrushes

Art with Alyssa: Nature's Paintbrushes

Create beautiful outdoor art using homemade paintbrushes from plants and items found in nature.Tips for Teachers/ParentsTeach children to respect living plants and only use found or discarded flower . . .

Read more

Art with Alyssa: How to Make a Nature Journal

Art with Alyssa: How to Make a Nature Journal

Creating and maintaining a nature journal is a fun, relaxing and educational activity for children (and adults) that encourages time outdoors and connection with nature. There is no right way to kee . . .

Read more

Art with Alyssa: Recycled Egg Carton Flowers

Art with Alyssa: Recycled Egg Carton Flowers

Turning trash into treasure is not only fun, it’s great for the planet. You’ll love this recycled art project that transforms a paper egg carton into a beautiful bouquet of flowers—perfect for . . .

Read more

Smiling Sun Craft

Smiling Sun Craft

Brighten up a spring or summer day with a smiling sun craft made with colorful yarn and glue. This project also makes a festive Cinco de Mayo decoration. Get creative and make your own unique design . . .

Read more

Art with Alyssa: Earth Monoprints

Art with Alyssa: Earth Monoprints

Celebrate Earth Day by doing an art project at home and participating in local Earth Day events around San Diego. Discussion Points for Teachers/Parents How to take care of the planet—Reduce, . . .

Read more

DIY Pool Noodle Lightsabers

DIY Pool Noodle Lightsabers

May the "fourth" be with you (the force, that is)! Whether you’re celebrating Star Wars Day on May 4 or hosting a Star Wars-themed birthday party, these easy DIY lightsabers are a hit with ki . . .

Read more

Make a Fiesta Banner

Make a Fiesta Banner

Make a festive decoration with this quick and easy DIY project for your Cinco de Mayo celebration at home.Supplies 6 sheets of tissue paper (10” x 20”)Several sheets of black paper or cardstockR . . .

Read more

Art with Alyssa: Marble Painting

Art with Alyssa: Marble Painting

  Marble painting is a great art project that encourages eye-hand coordination and muscle control. It’s fun to experiment with different colors and designs and it’s easy to adapt the project . . .

Read more

Art with Alyssa: DIY Miniature Book

Art with Alyssa: DIY Miniature Book

It’s really fun to craft your own mini books. They make thoughtful gifts for birthdays, Mother’s Day, Father’s Day and more, or a unique place to record your own ideas and quotes. There is lot . . .

Read more

Make and Send a Hug to Loved Ones

Make and Send a Hug to Loved Ones

Don’t you miss hugging people? Here’s a clever DIY hug craft that lets loved ones know they are missed! Whether it’s Mother's Day, Father’s Day, Teacher Appreciation, a birthday or some othe . . .

Read more

Describe Dad Father's Day Craft

Describe Dad Father's Day Craft

Supplies: CardboardDuct tapeAlphabet stickersPencilCraft knifeScissors Here’s how:1.|  Start by deciding how large the letters will be; the ones pictured here are about 11” tall and 7” w . . .

Read more

Be Family Informed – Sign up for our Newsletters below!

Subscribe