creepy cones sm

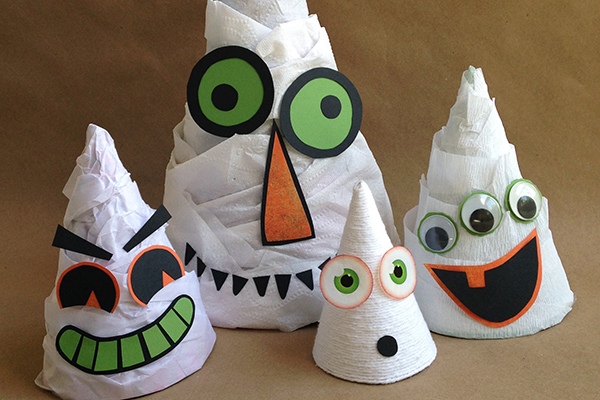
Kids can express their creativity making this fun, easy Halloween decoration. A search of the cupboards or a trip to the dollar store will supply everything needed to create these creepy cones for Halloween!

Supplies
Paper cone in desired size (birthday hat, drinking cup or one made from paper)
Roll of crepe paper streamers, toilet tissue or yarn, or strips of gift tissue
Scraps of colored paper
Stickers, googly eyes
Double-sided tape
White glue
Scissors

Directions
1.    Begin by sticking short strips of double-sided tape all over the paper cone, until most of it is covered.
2.    Roll out a long section of streamer, toilet tissue or yarn—or use scissors to cut a sheet of gift tissue into thin strips.
3.    Starting at the top of the cone, attach the chosen material to the sticky tape. Turning the cone, stick the material down and around until the entire surface is covered. Don’t worry if it’s lumpy or wrinkled, it just makes it more creepy.
4.    If needed, use scissors to trim excess material from around the bottom of the cone.
5.    Next, use scissors to cut cute or scary faces from paper. Stickers, googly eyes, buttons and other items can be used to make features, too.
6.    Use double-sided tape or white glue to adhere the face to the front of the cone.
7.    Make as many creepy cones as needed to decorate a classroom, mantle or party table for Halloween!

More tips and ideas:
•    Strips of cloth, ribbon, gauze, lace or even book pages can be used to cover the cones, too.
•    Look for, or make, white or light colored cones, to avoid colors and patterns showing through the white covering.
•    Birthday hats can be cut down to create different sized cones.
•    Try making creepy cones covered in black or other Halloween colors.
•    Instead of long strips, the cones can be covered with small torn pieces of crepe, tissue or paper, (easier for really little kids).
•    Cut facial features from drawings, magazines, felt or craft foam instead.
•    Try making the faces using only candy like licorice and candy corn.
•    Wear the creepy cones as party hats.
•    Make huge ones to decorate the front porch for Trick or Treaters.
•    Cover some cones in jute or burlap for a more rustic look.
•    Add a little glitter to make the creation more magical.
•    Glue plastic bugs onto the cones to add to the creepy factor.

----------

Pamela Maxwell is an artist, author and mother of two growing boys. Her craft and scrapbooking projects have appeared in numerous books and magazines. Photos by Pamela Maxwell.


Homemade Holiday: How to Make Beautiful Salt Dough Ornaments 

Homemade Holiday: How to Make Beautiful Salt Dough Ornaments 

One of my favorite childhood memories is decorating my grandma’s tree because I got to see ornaments my father, aunt and uncle made as children. I hope my nostalgia for homemade ornaments is inher . . .

Read more

Star of David Art Project

Star of David Art Project

Supplies One 12” x 12” canvas  Paintbrush Blue paint in 2-3 shades (the photo shows dark blue, light blue and turquoise)  White paint  Silver paint Water cup Old credit car . . .

Read more

Art with Alyssa: Poinsettia Yarn Painting

Art with Alyssa: Poinsettia Yarn Painting

Create a yarn painting featuring the season's favorite festive flower, the poinsettia. Find books about poinsettias at your local library to learn more about them. Did you know? Poinsettias are nat . . .

Read more

Twig Christmas Tree Decorations

Twig Christmas Tree Decorations

This is a fun Christmas craft for families that offers plenty of room for imagination and creativity! Use mini strands of tinsel to make glittery trees or twine for a more rustic look. Smaller trees . . .

Read more

DIY Christmas Advent Calendars

DIY Christmas Advent Calendars

      Everyone loves advent calendars that reveal a daily surprise—it's also really fun to make them! Start your own family traditions in the days leading up to Christmas (or any cel . . .

Read more

Hanukkah Place Card Holders

Hanukkah Place Card Holders

These happy Hanukkah bags serve as place card (or utensil) holders for the holiday table and make festive party favors!Supplies Small, flat brown (or white) paper bagsScraps of blue, white, silver p . . .

Read more

Art with Alyssa: Christmas Village Putz Houses 

Art with Alyssa: Christmas Village Putz Houses 

Get the whole family involved in creating vintage Christmas village houses using cardboard, glitter and a whole lot of creativity!  Vintage putz (or glitter houses) originated in Europe in the . . .

Read more

Art with Alyssa: Dreidel Garland

Art with Alyssa: Dreidel Garland

Get the kids involved in decorating for Hanukkah by making this festive dreidel garland by local art teacher, Alyssa Navapanich. There is lots of room for creativity using just a few art supplies. F . . .

Read more

12-Day Christmas Countdown

12-Day Christmas Countdown

The whole family can help make this cheerful tree to countdown the days to Christmas! Supplies 2 sheets of heavyweight scrapbooking paper or cardstock (12” x 12”) Scraps of plain and decorativ . . .

Read more

Art with Alyssa: DIY Menorah Craft

Art with Alyssa: DIY Menorah Craft

Get the kids involved in decorating for Hanukkah by designing a menorah with wooden blocks. Discussion Points for Parents/Teachers Talk about Hanukkah family traditions. Talk about the symbols . . .

Read more

Art with Alyssa: Make Beautiful Snowflakes

Art with Alyssa: Make Beautiful Snowflakes

This winter, gather the kids to make beautiful, colorful snowflakes using coffee filters and water-soluble markers. This craft project promotes creativity and a sense of intrigue as kids wait to see . . .

Read more

Hanukkah Countdown Calendar

Hanukkah Countdown Calendar

Count down to Hanukkah with this fun and easy craft—a menorah made with paper towel tubes and a few decorative supplies. Put a toy into eight of the tube “candles” to be unwrapped each night. . . .

Read more

Sock Snowman Craft

Sock Snowman Craft

This cute sock snowman craft is easy enough to make with the kids from items you probably have on hand at home. Thank you to Deborah at Super Moms 360 for sharing her project with us.Supplies 1 l . . .

Read more

New Year's Eve DIY Noisemakers

New Year's Eve DIY Noisemakers

Ring in the New Year with fun and festive DIY noisemakers (resolutions optional).SUPPLIES Empty aluminum soda or juice cans Pennies, small rocks, dried beans and/or jingle bells Leftover gift w . . .

Read more

Be Family Informed – Sign up for our Newsletters below!

Subscribe