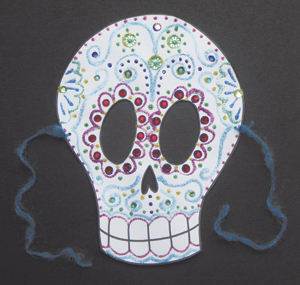
Make a mask for The Day of the Dead or Halloween that looks good enough to eat!


halloween sugar skull

Supplies:

  • 8 1/2” x 11” sheet of white card stock
  • Glitter glue pens
  • Pencil
  • Black permanent marker
  • Scissors
  • Hole-punch
  • String or ribbon
  • Rhinestones

••••••••••••••••••••••••••••••••••••••••••••••••••••

Here's How:

1.  Use a pencil to sketch an outline of a skull.

2.  Use scissors to cut out the printed or drawn skull and then trace around it with pencil onto the sheet of white card stock.

3.  Next, draw over the pencil lines with permanent marker and then use scissors to cut the mask out. (A parent may need to help cut out the eyes and nose.)

4.  Then, use the glitter glue pens to create patterns and designs on the mask.

5.  Adhere rhinestones into thick dots of the glitter glue if desired.

6.  Allow the mask to dry completely; this may take overnight.

7.  Use a hole-punch to make one hole on each side of the mask and then tie a 14” length of string or ribbon to each hole.

8.  Now, tie the mask on and begin the celebration!

••••••••••••••••••••••••••••••••••••••••••••••••••••••

More Ideas:

A similar glitter effect can be made by drawing designs with white glue and then sprinkling loose glitter onto them. Try this technique with colored craft sand, too.
Instead of glitter glue, use paint, markers, stickers, rubber stamps or cut paper to decorate the mask.
White glue can be used to adhere embellishments, too.
Decorate the mask with dots by pressing the tips of cotton swabs into wet craft paint and then stamping them onto the skull.
If rhinestones aren’t available, use buttons, beads and/or sequins instead.
Glue string or pom-poms onto the mask for additional accents.
Give the mask a more natural look by decorating it with seeds, sticks and tiny stones.
Add funny hair or a hat to the mask.
Use black card stock instead of white; fluorescent or glow-in-the dark paints would show up great on it.
In place of white cardstock, use colored card stock, a sheet of craft foam or even just a piece of thin cardboard.

---------------
Pamela Maxwell is an artist, author and mother of two busy little boys. Her craft and scrapbooking projects have appeared in numerous books and magazines. Her most recent book is “Memories in Miniature.” Photo by Pamela Maxwell.


How To Train Your Dragon Movie Activity Kit

How To Train Your Dragon Movie Activity Kit

Set on the rugged, windswept island of Berk, the movie How to Train Your Dragon follows Hiccup, a clever but underestimated teen who doesn’t quite fit in with his fellow Viking dragon-slayers. When . . .

Read more

Art with Alyssa: Nature Pendants

Art with Alyssa: Nature Pendants

Spring is an excellent time for nature-inspired art projects for kids. This month’s “Art with Alyssa” project provides instructions to make nature pendants, which make wonderful gifts for . . .

Read more

Art with Alyssa: Nature Weaving

Art with Alyssa: Nature Weaving

Supplies Twigs or sticks, 6–12” long Garden clippers Scissors Twine or yarn Variety of grasses, flowers and plants with long stems. (I used buttercup, euryops, geranium, lavender, rosemar . . .

Read more

Art with Alyssa: Nature's Paintbrushes

Art with Alyssa: Nature's Paintbrushes

Create beautiful outdoor art using homemade paintbrushes from plants and items found in nature.Tips for Teachers/ParentsTeach children to respect living plants and only use found or discarded flower . . .

Read more

Art with Alyssa: How to Make a Nature Journal

Art with Alyssa: How to Make a Nature Journal

Creating and maintaining a nature journal is a fun, relaxing and educational activity for children (and adults) that encourages time outdoors and connection with nature. There is no right way to kee . . .

Read more

Art with Alyssa: Recycled Egg Carton Flowers

Art with Alyssa: Recycled Egg Carton Flowers

Turning trash into treasure is not only fun, it’s great for the planet. You’ll love this recycled art project that transforms a paper egg carton into a beautiful bouquet of flowers—perfect for . . .

Read more

Smiling Sun Craft

Smiling Sun Craft

Brighten up a spring or summer day with a smiling sun craft made with colorful yarn and glue. This project also makes a festive Cinco de Mayo decoration. Get creative and make your own unique design . . .

Read more

Art with Alyssa: Earth Monoprints

Art with Alyssa: Earth Monoprints

Celebrate Earth Day by doing an art project at home and participating in local Earth Day events around San Diego. Discussion Points for Teachers/Parents How to take care of the planet—Reduce, . . .

Read more

DIY Pool Noodle Lightsabers

DIY Pool Noodle Lightsabers

May the "fourth" be with you (the force, that is)! Whether you’re celebrating Star Wars Day on May 4 or hosting a Star Wars-themed birthday party, these easy DIY lightsabers are a hit with ki . . .

Read more

Make a Fiesta Banner

Make a Fiesta Banner

Make a festive decoration with this quick and easy DIY project for your Cinco de Mayo celebration at home.Supplies 6 sheets of tissue paper (10” x 20”)Several sheets of black paper or cardstockR . . .

Read more

Art with Alyssa: Marble Painting

Art with Alyssa: Marble Painting

  Marble painting is a great art project that encourages eye-hand coordination and muscle control. It’s fun to experiment with different colors and designs and it’s easy to adapt the project . . .

Read more

Art with Alyssa: DIY Miniature Book

Art with Alyssa: DIY Miniature Book

It’s really fun to craft your own mini books. They make thoughtful gifts for birthdays, Mother’s Day, Father’s Day and more, or a unique place to record your own ideas and quotes. There is lot . . .

Read more

Make and Send a Hug to Loved Ones

Make and Send a Hug to Loved Ones

Don’t you miss hugging people? Here’s a clever DIY hug craft that lets loved ones know they are missed! Whether it’s Mother's Day, Father’s Day, Teacher Appreciation, a birthday or some othe . . .

Read more

Describe Dad Father's Day Craft

Describe Dad Father's Day Craft

Supplies: CardboardDuct tapeAlphabet stickersPencilCraft knifeScissors Here’s how:1.|  Start by deciding how large the letters will be; the ones pictured here are about 11” tall and 7” w . . .

Read more

Be Family Informed – Sign up for our Newsletters below!

Subscribe