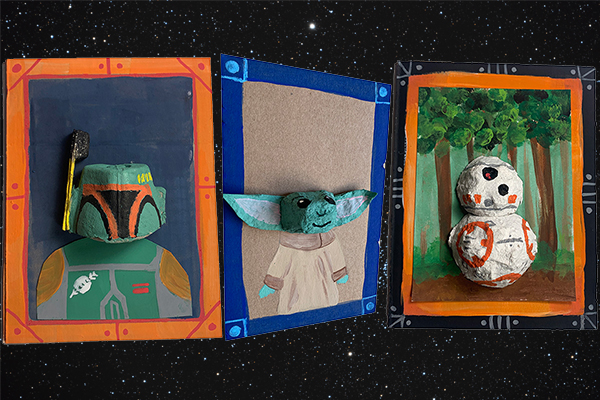
These fun Star Wars-inspired art projects require just paint, cardboard, egg cartons and a little imagination to create three-dimensional portraits of Baby Yoda, Boba Fett and BB-8. They serve as whimsical décor for “May the Fourth Be with You” celebrations (Star Wars Day is May 4), bedroom decor, or unique crafts for a Star Wars or Mandalorian-themed party. There are even directions to make Baby Yoda place cards for a Star Wars themed table setting.
Supplies
*Cardboard egg carton (NOT plastic or Styrofoam)
Scissors (plus smaller, pointed scissors, if desired)
Pencil
Paint (acrylic or tempera)
Paintbrush
Black marker
Flat cardboard (I used a 4x6 rectangle) OR thick 5x7 cardstock for place cards
White craft glue
Optional: googly eyes, small plastic gems to create galaxy, colorful pipe cleaner to make a light saber
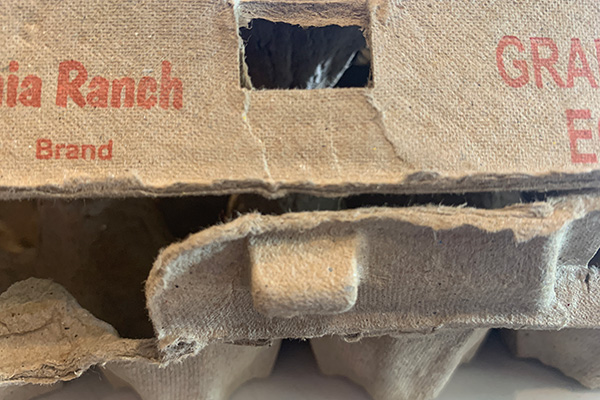
*NOTE: Egg cartons come in various shapes and styles. Some cartons have pointed dividers between the eggs and some have flatter dividers.
For Baby Yoda's face, you’ll want a carton that has flatter dividers.
For Boba Fett’s helmet, you will use the bottom egg cup portion.
For BB-8, I used a rounded egg cup from the 5-dozen egg pack at Costco.
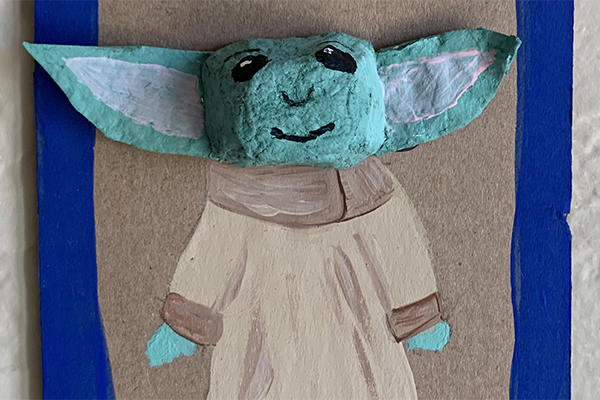
How to Make BABY YODA Portrait
- Remove the top half of the egg carton and save for making ears.
- For Baby Yoda’s face, use the protruding divider part of the egg carton that sits between the eggs (not the part the egg sits in). Cut roughly with larger scissors to separate the cup and divider from the carton. Once removed, it’s easier to cut closely (with optional small scissors) to get the desired face shape.
- Using the photo as a guide, sketch pointed ear shapes onto the carton top. Note that Baby Yoda’s ears are similar in width to his head. Cut out the ears.
- Paint the face and ear cut-outs light green; add light pink to the center of the ears; paint or draw black eyes, nose and mouth on the face. Optional: glue on googly eyes, if desired.
- Paint a decorative border around the edge of the cardboard rectangle (round corners first, if desired) to create the portrait frame. Use whatever color you like.
- Place Baby Yoda’s face and ears onto the cardboard and lightly trace where you want it. Set face and ears aside for now. Lightly draw Baby Yoda’s body (in this case, his robe) and paint as desired (I used beige and brown paint to create Yoda’s robe and painted light green “hands” at the end of the sleeves). Glue on optional details such as plastic gems to create a galaxy and/or a piece of pipe cleaner for a light saber.
- Allow to dry.
- Glue the Baby Yoda’s face and ears right above his robe, covering the tracing marks you made earlier.
- To hang, tape a loop of ribbon to the back of the cardboard.
Baby Yoda Place Cards
If you’re hosting a Star Wars or Mandalorian-inspired dinner or party, consider making place cards for your guests. Create place cards by folding 5x7 pieces of cardstock in half. Make one Baby Yoda face and pair of ears for each place card. Mostly follow the instructions above, but draw/paint the body off center (on the folded cardstock), so there is room to write someone’s name or whatever message you desire. Consider drawing a border around the edge instead of painting one.
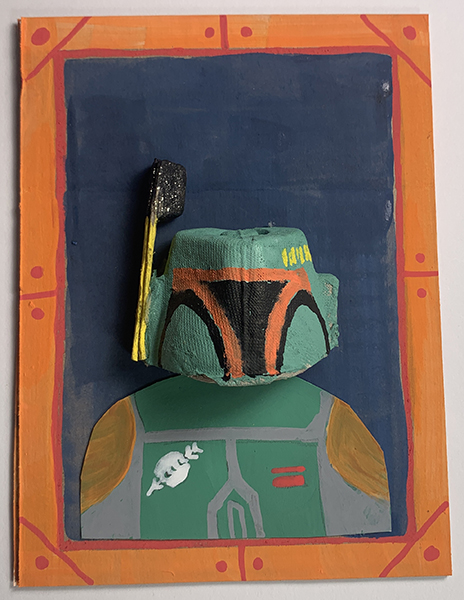
How to Make BOBA FETT Portrait
- Remove the top half of the egg carton and save for making other parts.
- For Boba Fett’s helmet, use the bottom cup of the egg carton (the part the egg sits in). Cut roughly with larger scissors to separate the cup and divider from the carton. Once removed, it’s easier to cut closely (with optional small scissors) to get the desired shape.
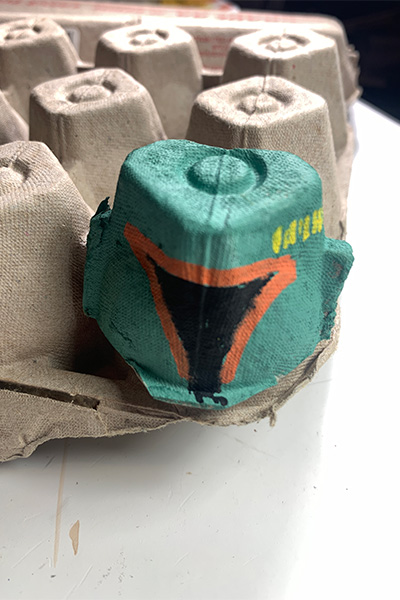
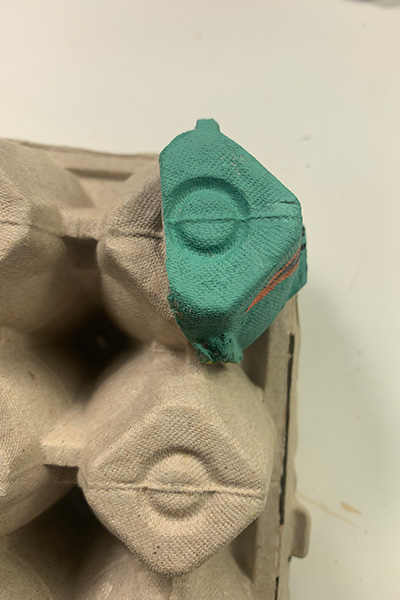
- Using the photos as a guide, sketch the helmet shape onto the egg carton and cut it out.
- Paint the helmet light green. Allow to dry. Paint an orange triangular shaped outline on the front. Allow to dry then add the black using marker or paint to the center. Add side arches and several short yellow lines above the orange and black shape.
- For the antenna, use the front tab part of the egg carton. Cut it out so that it looks like a flag. Cut a narrow strip the same length and width as the antenna piece and glue to the antenna. This will create a more finished look. Paint the bottom half of the antenna yellow and the top black. Allow to dry. Glue the antenna to the left side of the helmet.
- Create the portrait frame by painting a decorative border around the edge of the cardboard rectangle (round corners first, if desired). You can also paint a background inside the frame at this time if desired.
- Place Boba Fett’s helmet onto the cardboard and lightly trace where you want it. Set aside. Lightly draw Boba Fett’s body (his shoulders and chest plate) and paint as desired (I used grey and light green for the chest plate, and gold for the shoulders). Add additional details to the chest plate, such as the white emblem and red bars.
- Glue optional items (such as plastic gems) to the background to create a galaxy.
- Allow to dry.
- To hang, tape a loop of ribbon to the back of the cardboard.
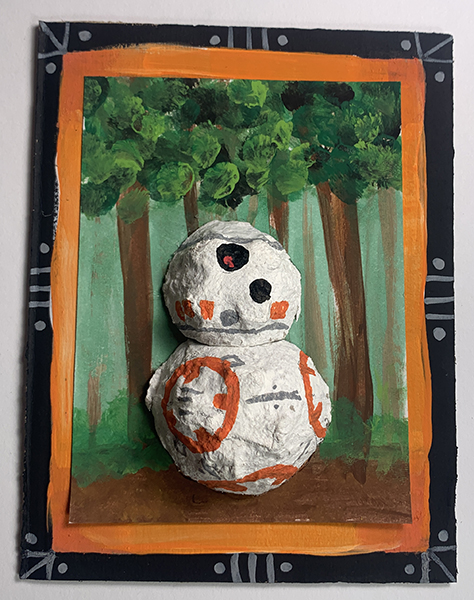
How to Make BB-8 Portrait
- For BB-8, cut out two egg cups: One cup should be 2 inches and the other 1½ to 1¼ inches. Egg cartons are slightly malleable so gently press the cardboard to make it more rounded for BB-8’s body. Paint both circles white. Allow to dry.
- Using the photo as a guide, paint on “gears” (shapes and lines) with grey and orange paint. Paint “eyes” with black and a dab of red paint. Optional: Use markers for these small details.
- Create the portrait frame by painting a decorative border around the edge of the cardboard rectangle (round corners first, if desired). You can also paint a background inside the frame, if desired.
- Glue BB-8’s bottom circle to the cardboard, glue his head on top of the bottom circle overlapping with the bottom slightly.
- Allow to dry.
- To hang, tape a loop of ribbon to the back of the cardboard.
This style of artwork was inspired by the work of a French artist (IG: @allmad.e.here) and art teacher Nylah Khan.
Alyssa Navapanich is a nationally recognized and award-winning art educator who is San Diego Family Magazine’s “Art with Alyssa” contributor. She teaches art to elementary school kids in East San Diego County.
________________


