Supplies:
Empty tissue box
Scraps of colored paper
Small amount of yellow air-dry clay
Small pieces of craft foam sheets or cardboard
Découpage gel (such as Mod Podge)
White glue
Small flat paintbrush
Scissors
2 buttons or googly eyes (optional)
Here’s how:
Tear scraps of colored paper into a few dozen squares about 1” big.
Use the paint brush to coat the découpage gel onto one side of the tissue box.
Start sticking the paper squares onto the wet box, painting more gel under the edges of the paper if needed.
Cover all four sides and the top of the box with the squares (leaving the hole open); paint over the entire box with another coating of the découpage gel.
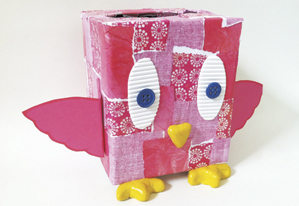
While the box dries, sculpt a little beak and two feet from the air-dry clay.
Next, cut wings and eyes from paper, cardboard or craft foam sheets.
After the box and clay have dried completely, use white glue to attach all the features to the box.
If desired, add two cute button eyes to finish.
Fill the birdie box with flowers, treats or another small gift, and it’s ready to wish Mom the best!
More ideas:
Cover the workspace with newspaper or waxed paper as this project can get a little messy.
If découpage gel is not available, use water to slightly thin white glue to make a substitution.
Make matching paper flowers for the birdie to hold or place a small jar filled with water inside the box to hold a little bouquet of fresh flowers.
Decorate with embellishments like feathers, sequins, glitter, pom-poms or even a little hat.
Make a small paper sign for the birdie to hold that reads, “Owl always love you,” or “A little birdie told me to wish you a Happy Mother’s Day.”
Decorate a new, full box so Mom can have a cute tissue dispenser for her desk or dresser.
–––––––––––––––––––––––––––––––
Pamela Maxwell is an artist, author and mother of two quickly growing boys. Her craft and scrapbooking projects have appeared in numerous books and magazines. Photo by Pamela Maxwell.


