Whether decorating at home or school, our Halloween doors are to “DIY” for! Not very crafty? Try the “mummy and me” door for beginners. More experienced crafters can try our “fear the waking dead” door. Either one will be a thrill for trick-or-treaters!

Click here for instructions on how to decorate a door for Día de los Muertos.

mummy door 2271

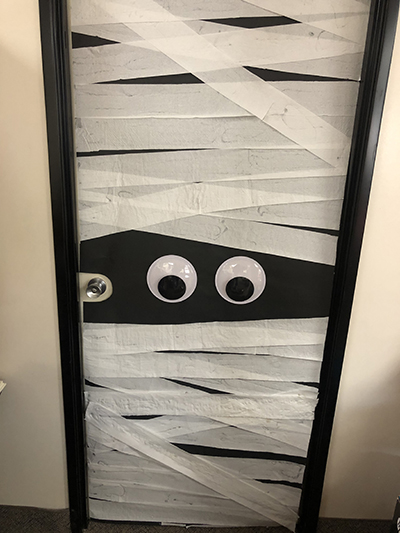
MUMMY AND ME Halloween Door (beginner)

SUPPLIES
Roll of black paper
Masking or Painter's Tape
2 extra-large googly eyes 
Hot glue/glue gun (for googly eyes)
Toilet paper
Clear craft glue
Scissors

DIRECTIONS

  1. Cut black paper to door size, leaving hole for the knob, and secure with tape. 
  2. Using hot glue, attach googly eyes (5 inches apart) about one-third of the way down from the top of the door. 
  3. Leaving a space around the eyes for where the mummy face would be, attach toilet paper with clear craft glue at irregular and opposing angles across the door as though wrapping a sarcophagus.
  4. Optional: Attach a sign (ideas below).

Sign ideas for home:

  • I {heart} my mummy
  • We're dying to meet you!

Sign ideas for a classroom:

  • Mummy and Me Toddler Time
  • We're dying to learn about Egypt

monster door 2271

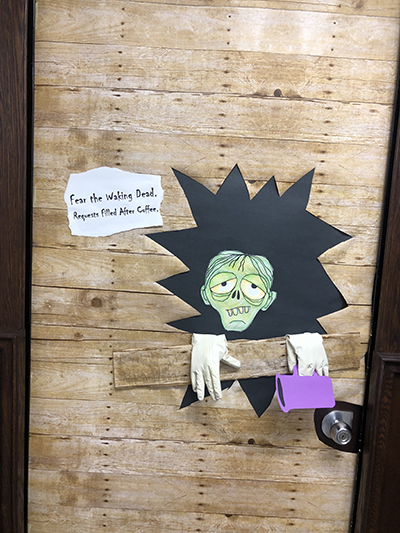
FEAR THE WAKING DEAD Halloween door (advanced)

This 3D zombie door is great for night owls, teen bedrooms and parents who need coffee before fulfilling family requests.

SUPPLIES
Rustic Wood “Better Than Paper” Bulletin Board Roll (wood-look paper by Teacher Created Resources — available at craft stores)
Scissors
Masking or Painter's Tape
Pencil
Medium cardboard box
Black poster board or paper 18” x 24”
Zombie face printout (below) or life-size head shot of family member
A pair of white, grey or flesh-colored rubber gloves, lightly stuffed with paper or filler
Hot glue/glue gun
White craft glue
Utility knife
True-to-size color copy of a coffee cup (or one drawn on paper)
Black marker
White cardstock

DIRECTIONS

  1. Measure and cut wood-look paper to fit the door. Secure with tape, but leave one (long) side open for a later step.
  2. Determine where your zombie will “break through” the door and draw a jagged shape no bigger than 18”x 24” (off center; about chest high of an adult). Cut out the shape and discard. 
  3. Cut a 4”x 21” strip of cardboard. Cut one "board" from the wood-look paper roll and attach to the strip of cardboard with glue. Set aside for now.
  4. Cut out the zombie face and glue to the center of the black poster board. 
  5. Slip the poster board behind the wood-look paper (through the open edge). Center the zombie face in the opening and glue the black poster board to the paper (not the door!). Trim edge of black poster board, if needed.
  6. Tape down the side of wood-look paper that you previously left open.
  7. Hot glue the wrists of the gloves to the back of the cardboard strip so that the fingers hang down correctly over the front (thumbs facing inward, so it looks like the gloves are grasping the board). 
  8. Secure the paper cup and gloves to the front of the “board” — making sure it appears one glove is grasping the cup. 
  9. Using hot glue, attach the board across the bottom of the break-through space, just below the zombie face. 
  10. Use black marker to draw nail heads so it looks as if the boards have been nailed onto the door. 
  11. Make a sign on white cardstock and attach near the zombie opening. Ours says “Fear the Waking Dead: Requests filled after coffee.”
  12. Optional: Add spooky or fun items like paper chains, fake nails or spiders, based on your theme.

Door ideas for school library

Attach a color copy of a favorite book cover (instead of coffee cup). 

Sign ideas:

  • Beware the unREAD
  • Book fines can be deadly. Return your library books on time!

monster 2271 

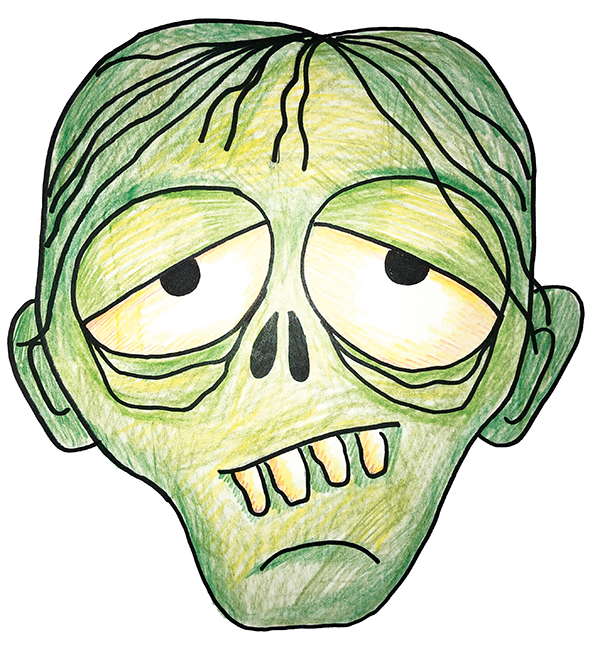
Free printable zombie face!
Download a pdf of this ZOMBIE FACE to print and cut out for the Fear of the Waking Dead Halloween Door (or other decoration).

________

Emily Dolton is a local artist, Ravenclaw and mummy to two teen boys.

Click here for instructions on how to decorate a door for Día de los Muertos.

________

DIY Christmas Advent Calendars

DIY Christmas Advent Calendars

      Everyone loves advent calendars that reveal a daily surprise—it's also really fun to make them! Start your own family traditions in the days leading up to Christmas (or any cel . . .

Read more

Art with Alyssa: Christmas Village Putz Houses 

Art with Alyssa: Christmas Village Putz Houses 

Get the whole family involved in creating vintage Christmas village houses using cardboard, glitter and a whole lot of creativity!  Vintage putz (or glitter houses) originated in Europe in the . . .

Read more

Art with Alyssa: Poinsettia Yarn Painting

Art with Alyssa: Poinsettia Yarn Painting

Create a yarn painting featuring the season's favorite festive flower, the poinsettia. Find books about poinsettias at your local library to learn more about them. Did you know? Poinsettias are nat . . .

Read more

Twig Christmas Tree Decorations

Twig Christmas Tree Decorations

This is a fun Christmas craft for families that offers plenty of room for imagination and creativity! Use mini strands of tinsel to make glittery trees or twine for a more rustic look. Smaller trees . . .

Read more

Crayon Holder Craft for the Kids Holiday Table

Crayon Holder Craft for the Kids Holiday Table

These crayon holders are perfect for the kids’ table for Thanksgiving, Christmas or any winter-themed party or gathering. The kids can decorate the crayon holders first (two free, printable pic . . .

Read more

How to Make Candy Land Yard Decorations

How to Make Candy Land Yard Decorations

These pop art candy decorations were made to create an amazing Candy Land-themed house in Clairemont Mesa (San Diego). They’re inexpensive to make and have multiple uses as they can also be used a . . .

Read more

Art with Alyssa: DIY Menorah Craft

Art with Alyssa: DIY Menorah Craft

Get the kids involved in decorating for Hanukkah by designing a menorah with wooden blocks. Discussion Points for Parents/Teachers Talk about Hanukkah family traditions. Talk about the symbols . . .

Read more

Hanukkah Countdown Calendar

Hanukkah Countdown Calendar

Count down to Hanukkah with this fun and easy craft—a menorah made with paper towel tubes and a few decorative supplies. Put a toy into eight of the tube “candles” to be unwrapped each night. . . .

Read more

Hanukkah Place Card Holders

Hanukkah Place Card Holders

These happy Hanukkah bags serve as place card (or utensil) holders for the holiday table and make festive party favors!Supplies Small, flat brown (or white) paper bagsScraps of blue, white, silver p . . .

Read more

Art with Alyssa: Dreidel Garland

Art with Alyssa: Dreidel Garland

Get the kids involved in decorating for Hanukkah by making this festive dreidel garland by local art teacher, Alyssa Navapanich. There is lots of room for creativity using just a few art supplies. F . . .

Read more

Marshmallow Snowman Card

Marshmallow Snowman Card

Kids can create great winter greeting cards while they enjoy a mug of hot chocolate with marshmallows. Just put out some paint, colored paper and a few extra marshmallows for stamping! Su . . .

Read more

Art with Alyssa: Make Beautiful Snowflakes

Art with Alyssa: Make Beautiful Snowflakes

This winter, gather the kids to make beautiful, colorful snowflakes using coffee filters and water-soluble markers. This craft project promotes creativity and a sense of intrigue as kids wait to see . . .

Read more

Sock Snowman Craft

Sock Snowman Craft

This cute sock snowman craft is easy enough to make with the kids from items you probably have on hand at home. Thank you to Deborah at Super Moms 360 for sharing her project with us.Supplies 1 l . . .

Read more

Make and Send a Hug to Loved Ones

Make and Send a Hug to Loved Ones

Don’t you miss hugging people? Here’s a clever DIY hug craft that lets loved ones know they are missed! Whether it’s Mother's Day, Father’s Day, Teacher Appreciation, a birthday or some othe . . .

Read more

Be Family Informed – Sign up for our Newsletters below!

Subscribe