"Pop" art

Tell your dad how much you love him this Father’s Day with a fun recycled "Pop Art" sign!

Supplies:
Empty CD case
Unwanted book, comic or newspaper
Old magazines
Scraps of colored paper
12 soda bottlecaps
Quarter coin
Pencil
Scissors
Permanent glue stick
1/2” wide adhesive “dots”
White glue (optional)
Paintbrush (optional)

Here’s How:

 1. First, tear a couple of pages out of an old book, comic or newspaper; then, tear them into strips about 1” x 3”.
 2. One at a time, cover the back of the strips with a glue stick and wrap them around the CD case until both sides and the edges are completely covered.
 3. Next, it’s not required, but if desired mix some white glue with a few drops of water and “paint” the wrapped CD case with the mixture. Paint one side at a time, allowing the “paint” to dry between coats.
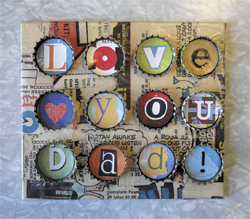
 4. Then, use a pencil to trace around a quarter onto different colored scraps of paper to make 12 circles. Use scissors to cut them all out.
 5. Now, look through old magazines to find the letters that spell out “Love you Dad!” and use scissors to cut them out.
 6. With the glue stick, adhere one letter to 11 of the paper circles.
 7. For the 12th circle, cut a little heart out of colored paper and glue it on.
 8. Then, one at a time, press the back of each paper circle onto a glue dot to remove the glue dot from it’s backing and then adhere the circle into a bottle-cap.
 9. Now, one at a time, press the back of each bottle-cap onto a glue dot and adhere each bottle-cap in order onto the covered CD case.
10. Gift wrap the finished sign with another page from a magazine, book, comic, or newspaper for a great Father’s Day surprise!

 
More ideas:
• “Dots” of adhesive are a clean, easy way to glue all sorts of projects and are available in stores with the scrapbooking supplies.
• If glue dots are not available, use a permanent glue stick to adhere the circles of paper into the bottle-caps and use white glue to adhere the bottle-caps to the background.
• Use thick “3D” glue dots to make the bottle-caps “pop” out even more.
• Instead of metal bottle caps, use plastic bottle lids, checker pieces or poker chips.
• If available, use a template or paper punch in place of a quarter to create the circles.
• In addition to letters cut from magazines, try using alphabet stickers, rubber stamps or simply write them with marker.
• For a quicker project, use the quarter to trace and cut circles around letters directly from the magazines.
• If coating the paper covered CD, decoupage or papier-mache medium can be used instead of the glue and water mixture.
• For a different look, create a monochromatic sign by only using papers and letters in different shades of one color.
• For a bigger sign, use an old record cover or cut a piece of foam board.
• For bigger letters, or circles that can fit one word instead of one letter each, use metal frozen juice can lids.
• Use rough wood for the background and omit covering it with torn strips of paper.
• Glue magnets onto the back of each bottle-cap to make a changeable sign that can be spelled out onto a metal sign, or onto a filing cabinet or refrigerator.
• Create a different message like “Happy Father’s Day” or “#1 Dad” by changing the shape and size of the background piece.
• Attach small photographs of kids, drawings, or other images besides letters into the bottle-caps too.
• Use yellowed, vintage books or magazines for a really fun look.
• Glue tiny toys or other 3D elements into any bottle-caps without letters.
• Tear the background and cut extra pictures for the bottle-caps from papers that represent Dad’s interests or hobby- such as the sports pages of the newspaper, a Golf magazine, a tool catalog, or a favorite comic book. But, make sure • Dad is done with his reading material first!
• Try this project to make greetings and decorations for other events and holidays.
• Make one for a bedroom door plaque or for themed kid’s room décor too!

Pamela Maxwell is an artist, author and mother of two boys. Photo by Pamela Maxwell.

------------

Art with Alyssa: Shamrock Watercolor Banner

Art with Alyssa: Shamrock Watercolor Banner

Here’s a St. Patrick’s Day art project the whole family can get excited about! Make beautiful watercolor designs and cut them into shamrock shapes to make a decorative banner or cards for loved . . .

Read more

Art with Alyssa: How to Make a Leprechaun Trap for St. Patrick's Day

Art with Alyssa: How to Make a Leprechaun Trap for St. Patrick's Day

Have fun this St. Patrick’s Day making leprechaun traps with the kids. Start by reading a related story, such as How to Catch a Leprechaun by Adam Wallace, for inspiration. Then use imagination an . . .

Read more

Lucky Leprechauns

Lucky Leprechauns

This St. Patrick’s Day create some cute leprechauns from plastic eggs and craft scraps.SuppliesGreen plastic Easter eggsScraps of craft foam, felt or paperSmall, miscellaneous craft items (ribbon, . . .

Read more

Swirly Shamrocks

Swirly Shamrocks

Craft this cute shamrock for St. Paddy’s Day with green paper, glue and a little glitter. You'll Need:4 sheets of 8 1/2 x 11 green cardstock or construction paperPencilRulerScissorsWhite glueTr . . .

Read more

Art with Alyssa: Nature Pendants

Art with Alyssa: Nature Pendants

Spring is an excellent time for nature-inspired art projects for kids. This month’s “Art with Alyssa” project provides instructions to make nature pendants, which make wonderful gifts for . . .

Read more

Art with Alyssa: How to Make a Nature Journal

Art with Alyssa: How to Make a Nature Journal

Creating and maintaining a nature journal is a fun, relaxing and educational activity for children (and adults) that encourages time outdoors and connection with nature. There is no right way to kee . . .

Read more

Art with Alyssa: Nature Weaving

Art with Alyssa: Nature Weaving

Supplies Twigs or sticks, 6–12” long Garden clippers Scissors Twine or yarn Variety of grasses, flowers and plants with long stems. (I used buttercup, euryops, geranium, lavender, rosemar . . .

Read more

Spring Bunny Cup

Spring Bunny Cup

This spring, craft a cute bunny cup to hold Easter treats! You'll Need:Paper cupScraps of pretty paper12” length of crepe paper streamerChenille stemGlitter3 buttons3 pom-pomsWhite gluePencilMark . . .

Read more

Burlap Bunny Treat Bags

Burlap Bunny Treat Bags

These cute burlap bunnies are fun to create and fill with treats, making them perfect for friends or classmates! Kids can participate in assembling or decorating these treat filled easter decoration . . .

Read more

Easter Egg Decor

Easter Egg Decor

Decorate real eggs this Easter to look like sweet treats such as cupcakes, lollipops and wrapped candies. SuppliesEggsEgg decorating kit/dye of choiceSmall pieces of colored and clear cellophaneBake . . .

Read more

Art with Alyssa: Recycled Egg Carton Flowers

Art with Alyssa: Recycled Egg Carton Flowers

Turning trash into treasure is not only fun, it’s great for the planet. You’ll love this recycled art project that transforms a paper egg carton into a beautiful bouquet of flowers—perfect for . . .

Read more

Art with Alyssa: Recycled Easter “Eggs”

Art with Alyssa: Recycled Easter “Eggs”

Combining Easter fun and environmental awareness in honor of Earth Day is a win-win in our eyes. Here are instructions to make DIY Easter “eggs”— a fun and clever way to wrap and hide treats f . . .

Read more

Art with Alyssa: DIY Easter Treat Baskets

Art with Alyssa: DIY Easter Treat Baskets

Make miniature baskets using simple materials like paper plates, pipe cleaners and markers; then deliver springtime treats to neighbors and friends! Supplies Paper plates, one per basket Marker . . .

Read more

Art with Alyssa — Bunch of Bunnies

Art with Alyssa — Bunch of Bunnies

This cute bunny craft is a perfect springtime or Easter activity for the kids to do at home, school or with friends. You may already have some of these supplies around the house. SuppliesOne short . . .

Read more

Be Family Informed – Sign up for our Newsletters below!

Subscribe