worry doll 600x400

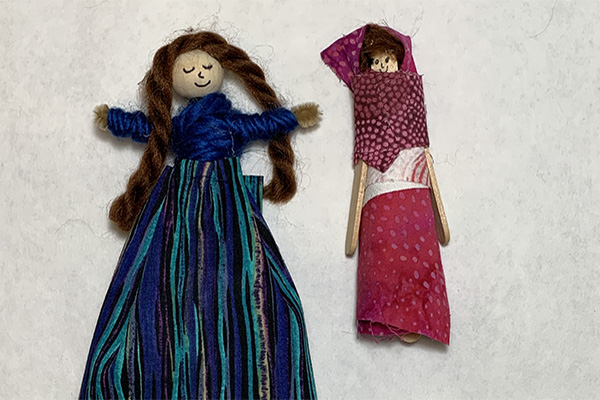
Honor Hispanic Heritage Month with your family by making worry dolls from Guatemala. It will be fun to see everyone’s creative designs! The projects below from local San Diego art educator, Alyssa Navapanich, include directions for craft stick worry dolls and pipe cleaner worry dolls. Do whichever project you prefer.

Worry dolls have been created by the indigenous people of Guatemala for centuries. According to legend, when children (and adults) have worries that keep them up at night, they can tell their worry dolls before going to sleep and the dolls will worry for them, allowing kids to sleep soundly. A related picture book my students love is “Silly Billy” by Anthony Browne. Another book I recommend is “The Legend of the Worry Doll” by Terilee Greeff.
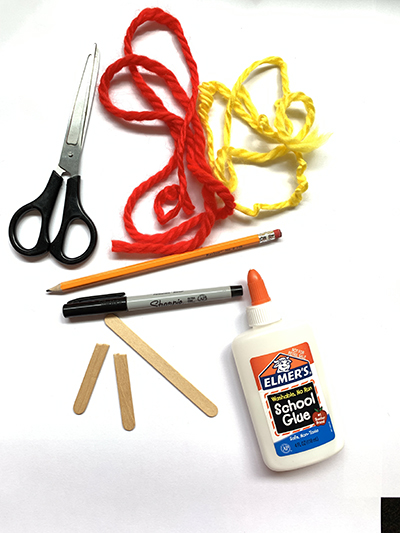
 

 worry doll 4

Supplies

  • Two craft sticks (standard size) OR two chenille stems (pipe cleaners) and one 1½-inch wooden bead FOR EACH DOLL
  • Brightly colored yarn
  • White glue 
  • Pencil
  • Scissors
  • Thin permanent markers
  • Brightly colored fabric scraps


Pipe Cleaner (chenille stem) Worry Doll Directions

  1. Cover your workspace with an opened large paper bag, placemat or plastic cloth.

    worry doll 1 worry doll 2 worry doll 3
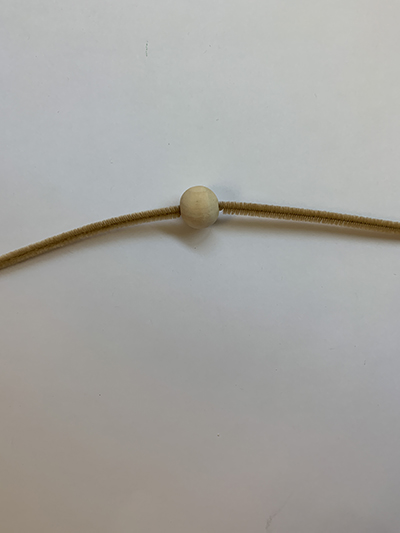
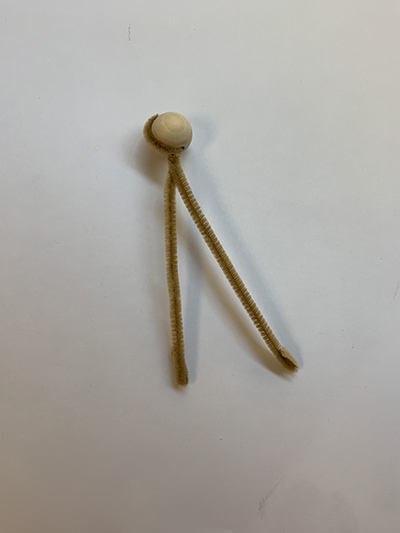
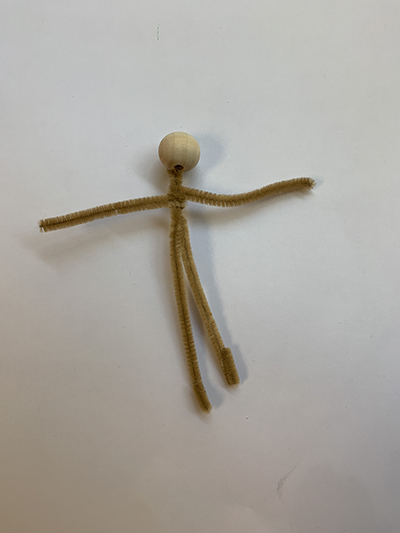
  2. Insert a chenille stem into a bead pushing the bead to the center of the pipe cleaner. Fold the pipe cleaner over the bead and twist the pipe cleaner under the bead to secure. 

  3. For the arms, cut the second pipe cleaner in half and fold the ends to form hands and feet.

    worry doll 6
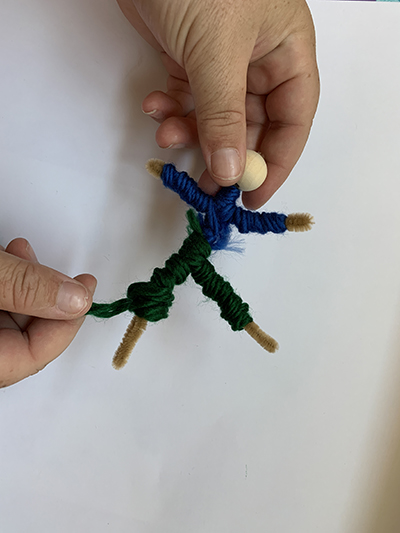
  4. Wrap yarn (or fabric) around the “body;” under the bead (head) to cover the neck, around each arm (leaving hands exposed) and the torso. To change colors for pants, cut the first yarn and tie it to the new color. Hide the knot by wrapping over it with the new yarn. Continue wrapping around each leg (leave feet exposed) to make pants. See photos for reference.

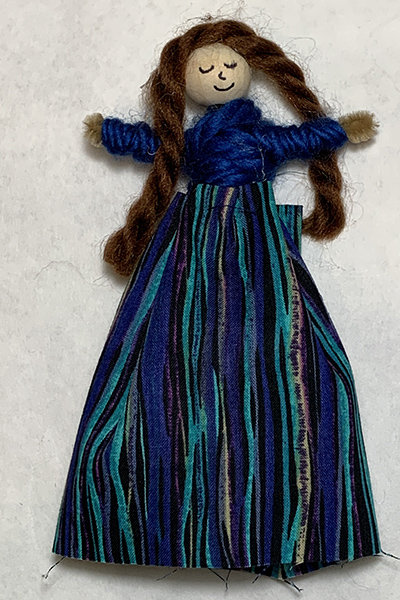
  5. Using a marker, add a face and other details you choose. Add yarn for hair or fabric for a hat.

 finished worry doll pipe cleaner


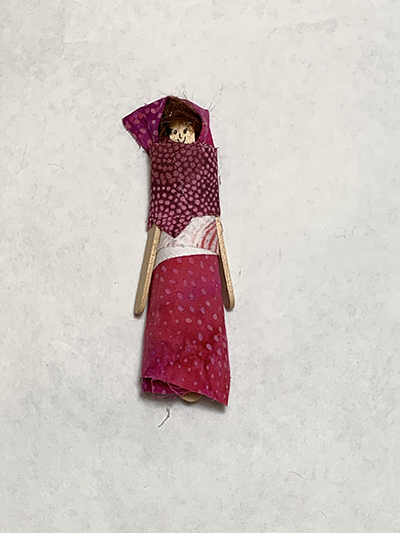
Craft Stick Worry Doll Directions

  1. Cover your workspace with an opened large paper bag, placemat or plastic cloth.

    worry doll 5
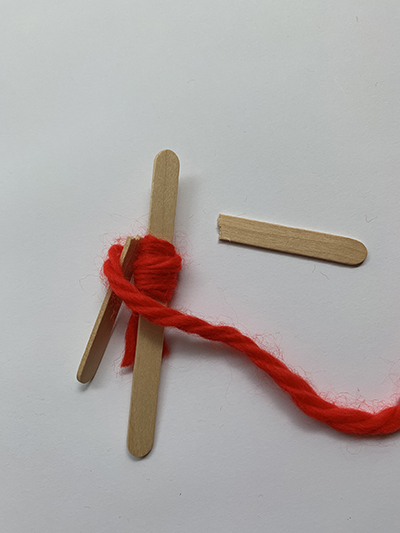
  2. Break or cut one craft stick in half, ensuring both pieces are as equal in length as possible. These will be the arms of the worry doll.

  3. Tie yarn (or fabric strips) around the middle of the unbroken craft stick (this will be the doll's waist). Begin wrapping the yarn upward towards the “head” covering the stick as you go, leaving about a one-inch space at the top. 

  4. Align the two halved craft stick pieces along the main stick at the point where the arms should be. Hold the arms in place and wrap the yarn around them to secure them to the body. You may want to add a dab of white glue to help secure them before wrapping. See photos for reference. 

  5. Continue wrapping the yarn tightly around the craft stick, moving up from the arms to the waist. Leave enough room to draw a face. Tuck the end into the last wrap and secure it with a dab of glue. 

  6. Next wrap yarn under the arms, going down to the bottom of the stick. You may leave a space at the bottom for shoes, if you wish. Note: If switching yarn colors, cut the first yarn and tie it to the new color, then hide the knot by wrapping yarn over it. Continue wrapping, changing colors as often as you like.

    worry doll 7 
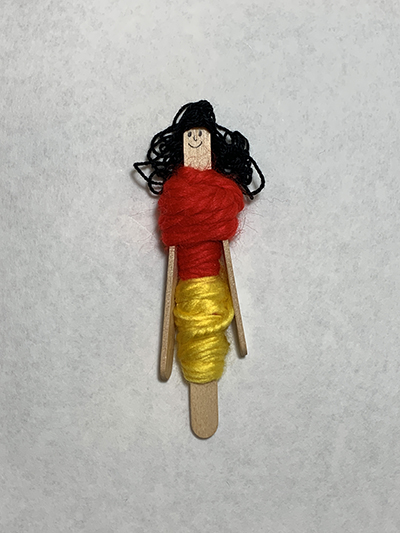
  7. Once you've wrapped the yarn down to the bottom of the doll, cut the yarn and secure it by pushing it underneath the last wrap and secure with a dab of glue. If you want to add a fabric skirt or other clothing, now is the time to do it. Cut fabric to fit around the doll and secure with glue. 

  8. Use fine tip pens to draw facial features on the craft stick and shoes (optional). Add yarn for hair, if you wish.

 worry doll 8

Alyssa Navapanich is an award-winning art educator who teaches art to elementary school kids in San Diego's East County. All photos provided by her.


Art with Alyssa: Shamrock Watercolor Banner

Art with Alyssa: Shamrock Watercolor Banner

Here’s a St. Patrick’s Day art project the whole family can get excited about! Make beautiful watercolor designs and cut them into shamrock shapes to make a decorative banner or cards for loved . . .

Read more

Art with Alyssa: How to Make a Leprechaun Trap for St. Patrick's Day

Art with Alyssa: How to Make a Leprechaun Trap for St. Patrick's Day

Have fun this St. Patrick’s Day making leprechaun traps with the kids. Start by reading a related story, such as How to Catch a Leprechaun by Adam Wallace, for inspiration. Then use imagination an . . .

Read more

Lucky Leprechauns

Lucky Leprechauns

This St. Patrick’s Day create some cute leprechauns from plastic eggs and craft scraps.SuppliesGreen plastic Easter eggsScraps of craft foam, felt or paperSmall, miscellaneous craft items (ribbon, . . .

Read more

Swirly Shamrocks

Swirly Shamrocks

Craft this cute shamrock for St. Paddy’s Day with green paper, glue and a little glitter. You'll Need:4 sheets of 8 1/2 x 11 green cardstock or construction paperPencilRulerScissorsWhite glueTr . . .

Read more

Art with Alyssa: Nature Pendants

Art with Alyssa: Nature Pendants

Spring is an excellent time for nature-inspired art projects for kids. This month’s “Art with Alyssa” project provides instructions to make nature pendants, which make wonderful gifts for . . .

Read more

Art with Alyssa: How to Make a Nature Journal

Art with Alyssa: How to Make a Nature Journal

Creating and maintaining a nature journal is a fun, relaxing and educational activity for children (and adults) that encourages time outdoors and connection with nature. There is no right way to kee . . .

Read more

Art with Alyssa: Nature Weaving

Art with Alyssa: Nature Weaving

Supplies Twigs or sticks, 6–12” long Garden clippers Scissors Twine or yarn Variety of grasses, flowers and plants with long stems. (I used buttercup, euryops, geranium, lavender, rosemar . . .

Read more

Spring Bunny Cup

Spring Bunny Cup

This spring, craft a cute bunny cup to hold Easter treats! You'll Need:Paper cupScraps of pretty paper12” length of crepe paper streamerChenille stemGlitter3 buttons3 pom-pomsWhite gluePencilMark . . .

Read more

Burlap Bunny Treat Bags

Burlap Bunny Treat Bags

These cute burlap bunnies are fun to create and fill with treats, making them perfect for friends or classmates! Kids can participate in assembling or decorating these treat filled easter decoration . . .

Read more

Easter Egg Decor

Easter Egg Decor

Decorate real eggs this Easter to look like sweet treats such as cupcakes, lollipops and wrapped candies. SuppliesEggsEgg decorating kit/dye of choiceSmall pieces of colored and clear cellophaneBake . . .

Read more

Art with Alyssa: Recycled Egg Carton Flowers

Art with Alyssa: Recycled Egg Carton Flowers

Turning trash into treasure is not only fun, it’s great for the planet. You’ll love this recycled art project that transforms a paper egg carton into a beautiful bouquet of flowers—perfect for . . .

Read more

Art with Alyssa: Recycled Easter “Eggs”

Art with Alyssa: Recycled Easter “Eggs”

Combining Easter fun and environmental awareness in honor of Earth Day is a win-win in our eyes. Here are instructions to make DIY Easter “eggs”— a fun and clever way to wrap and hide treats f . . .

Read more

Art with Alyssa: DIY Easter Treat Baskets

Art with Alyssa: DIY Easter Treat Baskets

Make miniature baskets using simple materials like paper plates, pipe cleaners and markers; then deliver springtime treats to neighbors and friends! Supplies Paper plates, one per basket Marker . . .

Read more

Art with Alyssa — Bunch of Bunnies

Art with Alyssa — Bunch of Bunnies

This cute bunny craft is a perfect springtime or Easter activity for the kids to do at home, school or with friends. You may already have some of these supplies around the house. SuppliesOne short . . .

Read more

Be Family Informed – Sign up for our Newsletters below!

Subscribe