star of david

Supplies:
2 (or more) sheets of 12” x 12” colored or printed cardstock
Clear tape
Double-sided tape
String or ribbon
Pencil
Ruler
Scissors

••••••••••••••••••••••••••••••••••••••••••••••••••••
Here's How:

 1.|  To create the strips of paper, line a ruler against one edge of a piece of cardstock, and then trace along it with a pencil, creating a shape about 1” wide and 12” long.

2.| Use scissors (or a craft knife) to cut the strip off the paper.

3.| Repeat the first two steps on the desired colors and patterns of paper until there are 15 strips, each measuring about 1” wide by 12” long.

 4.| Cut 3 of the strips in half, creating six 6” strips.

 5.| Fold the 12” strips into triangles one–at-a-time by laying the ruler 4” in on one side and folding the strip over the end of the ruler. Spin the strip around and measure and fold in 4” on the other end.

 6.| Use fingers to crease the folds and perfect the triangle shape; secure the open ends together with clear tape.

 7.| Now, to make small triangles out of the six 6” strips, measure and fold 2” in on both sides of each strip. Crease and tape them together.

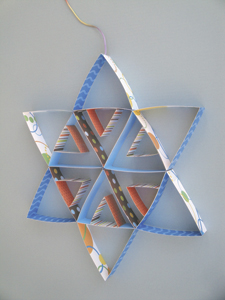
 8.| Next, use double-sided tape to adhere six of the large triangles together to form a hexagon (the center of the star).

 9.| Then, use double-sided tape to adhere the six smaller triangles inside the large ones as shown here.

10.| Also use double–sided tape to adhere the last six large triangles to the outside of the hexagon to create the points of the star.

11.| To hang the star, use a sharp pencil to carefully poke a small hole in the center of one point of the star, then thread one end of a length of string through the hole and tie a small knot to hold it in place.

••••••••••••••••••••••••••••••••••••••••••••••••••••••

More Ideas:
Use only solid-colored cardstock for a more serene version of the star.
Hand-color or draw designs on sheets of white cardstock to use for this project.
Double-sided scrapbooking paper is perfect for this project. Look for sheets with Hanukkah prints.
For a “greener” version of the project, and a totally different look, use recycled cereal and food boxes instead of cardstock.
Hang many stars on different lengths of string from the ceiling to decorate a whole wall or room.
To make smaller versions of the star, use shorter strips of paper and then fold them in thirds to form triangles.
Use little versions of the star as pretty additions to gift-wrapping.
Use poster board to create giant stars.
For a quicker project, eliminate the six smaller triangles.
For a more advanced project, create several more consecutive sizes of triangles to add inside each large one.
Add glue and glitter to the edges or sides of the cardstock for a sparkling star.
Embellish the star with stickers, sequins or rhinestones.
For even more detail, add beads or small stars to the hanging string.
Use only white cardstock to craft snowflakes instead of stars.
This project is a fun way to demonstrate and practice math skills such as measuring, fractions and basic geometry. 

---------------
Pamela Maxwell is an artist, author and mother of two busy little boys. Her craft and scrapbooking projects have appeared in numerous books, magazines and on television programs. Photo by Pamela Maxwell.

Art with Alyssa: Earth Monoprints

Art with Alyssa: Earth Monoprints

Celebrate Earth Day by doing an art project at home and participating in local Earth Day events around San Diego. Discussion Points for Teachers/Parents How to take care of the planet—Reduce, . . .

Read more

Art with Alyssa: How to Make a Nature Journal

Art with Alyssa: How to Make a Nature Journal

Creating and maintaining a nature journal is a fun, relaxing and educational activity for children (and adults) that encourages time outdoors and connection with nature. There is no right way to kee . . .

Read more

Art with Alyssa: Recycled Egg Carton Flowers

Art with Alyssa: Recycled Egg Carton Flowers

Turning trash into treasure is not only fun, it’s great for the planet. You’ll love this recycled art project that transforms a paper egg carton into a beautiful bouquet of flowers—perfect for . . .

Read more

Art with Alyssa: Nature Weaving

Art with Alyssa: Nature Weaving

Supplies Twigs or sticks, 6–12” long Garden clippers Scissors Twine or yarn Variety of grasses, flowers and plants with long stems. (I used buttercup, euryops, geranium, lavender, rosemar . . .

Read more

Art with Alyssa: Nature's Paintbrushes

Art with Alyssa: Nature's Paintbrushes

Create beautiful outdoor art using homemade paintbrushes from plants and items found in nature.Tips for Teachers/ParentsTeach children to respect living plants and only use found or discarded flower . . .

Read more

Art with Alyssa: Recycled Paper Bowl

Art with Alyssa: Recycled Paper Bowl

Not sure what to do with all those old magazines? Get creative and turn the pages into paper bowls or coasters! This is a great project to celebrate Earth Day – or just a fun way to spend a lazy a . . .

Read more

Raindrop Drip Painting

Raindrop Drip Painting

We don’t know many kids who can resist jumping in rain puddles. And since we don’t get rain puddles too often in San Diego, it’s a particularly unique and special activity! Why not commemorate . . .

Read more

DIY Instruments for Kids

DIY Instruments for Kids

Get creative and have a festive backyard parade with these beautiful homemade musical instruments! Local artist Emily Dolton shares step-by-step instructions on how to make a Melon Maraca, Citrus Dr . . .

Read more

Art with Alyssa: Paper Bag Memory Books

Art with Alyssa: Paper Bag Memory Books

Create a unique memory book to save special keepsakes and photos—and to reminisce about all the fun you had this summer!Discussion Points for Parents/Teachers Talk about your favorite summer me . . .

Read more

Smiling Sun Craft

Smiling Sun Craft

Brighten up a spring or summer day with a smiling sun craft made with colorful yarn and glue. This project also makes a festive Cinco de Mayo decoration. Get creative and make your own unique design . . .

Read more

DIY Drip Painting

DIY Drip Painting

Surprise Mom with this colorful art project that will light up her special day and make a cool piece of wall art for your home. Since the look is achieved from paint drips, each finished product is . . .

Read more

Art with Alyssa: African Maasai Family

Art with Alyssa: African Maasai Family

Celebrate diversity and families with this easy project that utilizes fabric scraps and materials you may already have. Consider framing the finished artwork and gifting it to a family member. The p . . .

Read more

Make and Send a Hug to Loved Ones

Make and Send a Hug to Loved Ones

Don’t you miss hugging people? Here’s a clever DIY hug craft that lets loved ones know they are missed! Whether it’s Mother's Day, Father’s Day, Teacher Appreciation, a birthday or some othe . . .

Read more

Art with Alyssa: How to Make a Tapa or Siapo Cloth

Art with Alyssa: How to Make a Tapa or Siapo Cloth

One way to learn about Asian American Pacific Islander (AAPI) Heritage Month is to do an art lesson and project together as a family, group of friends, class or scout group. Here we learn about tapa . . .

Read more

Be Family Informed – Sign up for our Newsletters below!

Subscribe