muffin tin menu

Makes breakfast planning easy!

This fun magnetic menu will involve kids and encourage even the fussiest of eaters to have healthy meals on hectic mornings! It's no secret that the kiddos get more excited about meals when they are part of the planning process. 

Supplies:

Regular size muffin tin
Sheet of heavyweight white paper
Sheet of heavyweight colored paper
Pencil
Black pen
Colored markers
Magnet business cards
Permanent glue stick
Scissors
Clear contact paper (optional)

Here's How:

 1. Repurpose an old muffin tin for this project. If you don't have any, you can buy an inexpensive one at a dollar or thrift store.
 
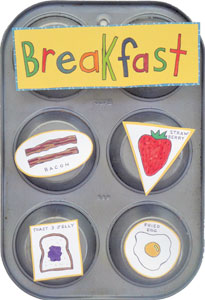
2. Write “Breakfast” onto light-colored paper, color it in and then cut around it in a rectangle shape.
 
3. Use a pencil to draw several of each shape—oval, triangle, square and circle onto the white paper. Cut all the shapes.
 
4. If desired, use a glue stick to adhere all the shapes to colored paper, and trim them, leaving some of the colored back piece showing around the edges.
 
5. Next, talk about choosing foods that make a nutritious meal, and brainstorm favorite items for each group. Assign each of the four shapes a food category (for example: oval for protein, triangle for fruit, square for carbs/grains and circle for dairy), and brainstorm favorite meal items that belong to each group.
 
6. Draw each food item on each shape, and then color them all in with markers. (Erasable pencil guidelines can be drawn first, and then traced over with the permanent pen.) The name of each item can be written on the shape, too.
 7.
An option at this point is to “laminate” each finished shape with clear contact paper to make the pieces more durable.
 8.
Trim thin magnetic business cards into smaller pieces that will fit on the back of each shape.
 
9. Glue the trimmed magnets onto the back of each shape.
10.
Now the menu is ready to use. Hang or prop the muffin tin (openings down, back side up) in an accessible place in the kitchen. Place the shapes in a small box or envelope next to the menu, and every night kids can choose one item of each shape to place onto the morning’s menu. Younger kids may need some help from Mom or Dad, while older kids may be able to prepare the breakfast themselves. In addition to having some say about what they eat, kids will learn about shapes, spelling, healthy eating, cooking and organization!

••••••••••••••••••••••••••••••••••••••••••••••••••••••

More Ideas:
Instead of drawing the shapes by hand, use a stencil.
Parents can do some parts of the project for younger children. Older children will enjoy completing it entirely themselves.
Words, stickers or magazine pictures of foods can be used in place of the drawings.
If the bond from the glue stick isn’t strong enough to hold the magnets on the back of each shape, use double-sided tape instead.
If the pantry is missing one of the items, simply remove that magnet before the kids choose.
No muffin tin available? Present the menu on a cookie sheet or simply on the fridge instead.
Make the menu more colorful by spray painting the muffin tin (a parent’s job).
Make menu magnets for lunch and dinner, too.
Add different choices from time to time to introduce new foods into the diet.
After choosing the menu the night before, use it as a guide to get everything ready for its preparation in the morning.

---------------
Pamela Frye is an artist, author and mother of two busy little boys. Her craft and scrapbooking projects have appeared in numerous books and magazines. Her most recent book is “Memories in Miniature.” Photo by Pamela Frye.

Homemade Holiday: How to Make Beautiful Salt Dough Ornaments 

Homemade Holiday: How to Make Beautiful Salt Dough Ornaments 

One of my favorite childhood memories is decorating my grandma’s tree because I got to see ornaments my father, aunt and uncle made as children. I hope my nostalgia for homemade ornaments is inher . . .

Read more

Star of David Art Project

Star of David Art Project

Supplies One 12” x 12” canvas  Paintbrush Blue paint in 2-3 shades (the photo shows dark blue, light blue and turquoise)  White paint  Silver paint Water cup Old credit car . . .

Read more

Art with Alyssa: Poinsettia Yarn Painting

Art with Alyssa: Poinsettia Yarn Painting

Create a yarn painting featuring the season's favorite festive flower, the poinsettia. Find books about poinsettias at your local library to learn more about them. Did you know? Poinsettias are nat . . .

Read more

Twig Christmas Tree Decorations

Twig Christmas Tree Decorations

This is a fun Christmas craft for families that offers plenty of room for imagination and creativity! Use mini strands of tinsel to make glittery trees or twine for a more rustic look. Smaller trees . . .

Read more

DIY Christmas Advent Calendars

DIY Christmas Advent Calendars

      Everyone loves advent calendars that reveal a daily surprise—it's also really fun to make them! Start your own family traditions in the days leading up to Christmas (or any cel . . .

Read more

Hanukkah Place Card Holders

Hanukkah Place Card Holders

These happy Hanukkah bags serve as place card (or utensil) holders for the holiday table and make festive party favors!Supplies Small, flat brown (or white) paper bagsScraps of blue, white, silver p . . .

Read more

Art with Alyssa: Christmas Village Putz Houses 

Art with Alyssa: Christmas Village Putz Houses 

Get the whole family involved in creating vintage Christmas village houses using cardboard, glitter and a whole lot of creativity!  Vintage putz (or glitter houses) originated in Europe in the . . .

Read more

Art with Alyssa: Dreidel Garland

Art with Alyssa: Dreidel Garland

Get the kids involved in decorating for Hanukkah by making this festive dreidel garland by local art teacher, Alyssa Navapanich. There is lots of room for creativity using just a few art supplies. F . . .

Read more

12-Day Christmas Countdown

12-Day Christmas Countdown

The whole family can help make this cheerful tree to countdown the days to Christmas! Supplies 2 sheets of heavyweight scrapbooking paper or cardstock (12” x 12”) Scraps of plain and decorativ . . .

Read more

Art with Alyssa: DIY Menorah Craft

Art with Alyssa: DIY Menorah Craft

Get the kids involved in decorating for Hanukkah by designing a menorah with wooden blocks. Discussion Points for Parents/Teachers Talk about Hanukkah family traditions. Talk about the symbols . . .

Read more

Art with Alyssa: Make Beautiful Snowflakes

Art with Alyssa: Make Beautiful Snowflakes

This winter, gather the kids to make beautiful, colorful snowflakes using coffee filters and water-soluble markers. This craft project promotes creativity and a sense of intrigue as kids wait to see . . .

Read more

Hanukkah Countdown Calendar

Hanukkah Countdown Calendar

Count down to Hanukkah with this fun and easy craft—a menorah made with paper towel tubes and a few decorative supplies. Put a toy into eight of the tube “candles” to be unwrapped each night. . . .

Read more

Sock Snowman Craft

Sock Snowman Craft

This cute sock snowman craft is easy enough to make with the kids from items you probably have on hand at home. Thank you to Deborah at Super Moms 360 for sharing her project with us.Supplies 1 l . . .

Read more

New Year's Eve DIY Noisemakers

New Year's Eve DIY Noisemakers

Ring in the New Year with fun and festive DIY noisemakers (resolutions optional).SUPPLIES Empty aluminum soda or juice cans Pennies, small rocks, dried beans and/or jingle bells Leftover gift w . . .

Read more

Be Family Informed – Sign up for our Newsletters below!

Subscribe