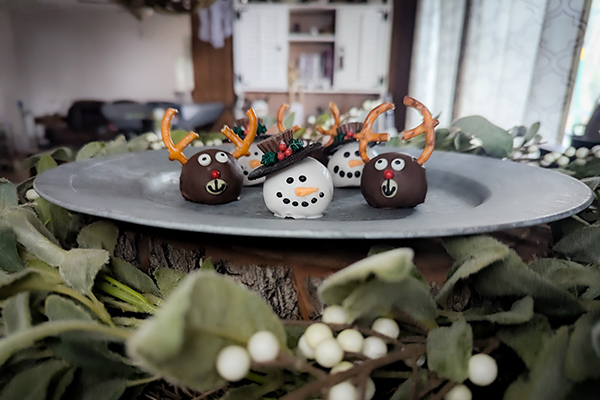
Good things come to those who bake, especially when stirring up something as adorable and delicious as these Frosty the Snowman and Rudolph the Red-Nosed Reindeer Cake Balls from local mom Jennifer Garcia. The kids will love rolling and decorating almost as much as they enjoy making them disappear. Cake ball truffles make festive holiday gifts for friends, classmates, co-workers and neighbors, so be sure to make enough for everyone on your nice list!
Yields 26–30 truffles
Ingredients
1 box cake mix (your favorite flavor), plus ingredients listed on back of box
¾ cup prepared frosting (creamy, not whipped); your desired flavor
2 tablespoons coconut oil
12 oz. chocolate almond bark (or cocoa candy melts)
12 oz. vanilla almond bark coating (or white candy melts)
Candy eyeballs
Large Red Nonpareils (or red balls from Holly Sprinkle Mix)
Pretzel twists, broken in half
Oil-based food coloring: black, yellow and orange
Oreo Thins, separated and cream filling removed
Reese’s Miniature Peanut Butter Cups, unwrapped
Holly Sprinkles Mix
*Optional: Edible glitter spray
Cake Ball Directions
- Line a baking sheet with parchment paper and set aside.
- Bake cake according to package directions. Let cool completely.
- Loosely break up cake into stand mixer or bowl. Mix on medium-low or stir until crumbled, about one minute.
- Add frosting. Continue mixing on medium-low until fully incorporated and mixture holds shape, like cookie dough.
- Gather mixture with your fingers, about the size of a golf ball, and roll gently between palms until smooth and round. Place onto parchment. Continue until all mixture is rolled.
- Freeze for at least two hours, or overnight for best results.
To Decorate Rudolph the Red-Nosed Reindeer Cake Balls
- Remove half the cake balls from the freezer and let sit at room temperature while melting chocolate almond bark or cocoa candy melts. Line another baking sheet with parchment paper.
- Add 1 tablespoon coconut oil to a candy melting pot, double boiler or microwave-safe bowl. Melt a few chunks of candy coating at a time on low heat, or in short bursts, if microwaving.
- Once candy coating is melted and smooth, remove from heat. Using a spoon, gently dip one cake ball at a time, ensuring a full, smooth coating.
- Spoon cake ball out of coating and place it onto lined baking sheet, tipping and tapping your spoon lightly while lifting away, as if serving a fried egg onto a plate.
- While coating is still wet, gently insert pretzel halves onto each side of the cake ball, forming Rudolph’s antlers.
- Add two candy eyes and one red nonpareil for Rudolph’s nose.
- Repeat steps 3–6 until Rudolph cake balls are “done.”
- Set aside and allow coating to harden.
- Continue with “Finish Small Details…” below.
To Decorate Frosty the Snowman Cake Balls
- Remove remaining cake balls from freezer and let sit at room temperature while melting vanilla candy coating. Move reindeer cake balls to a plate and flip parchment paper over for snowmen, or if Rudolph cake balls are not ready to move, line another baking sheet with parchment.
- Using vanilla almond bark or white candy melts, follow steps 2–4 under “To Decorate Rudolph…”
- While coating is still wet, gently top cake ball with one Oreo Thin to form the brim of Frosty’s hat. Using a toothpick, add a dollop of melted candy coating to the bottom of a mini Reese’s cup and place it on top of the cookie.
- Set aside snowman cake balls and allow coating to harden.
- Continue with “Finish Small Details…” below.

Finish Small Details of Rudolph and Frosty Cake Ball Truffles
- Spoon a small amount of melted white candy coating into a plastic baggie. Add a few drops of yellow, and a single drop of orange and black food coloring. Knead bag to mix colors, forming beige (for Rudolph’s muzzle). Add more food coloring if necessary, or more vanilla coating to lighten.
- Bag of coating should be cool to the touch. Cut a teeny tiny piece from one corner of the plastic bag to create a homemade piping bag.
- For Rudolph’s muzzle: Check that reindeer coating is dry before picking up each cake ball and gently squeezing the plastic piping bag to draw a circle right below Rudolph’s nose (see photo for reference). Allow to harden. NOTE: If you put cake balls down immediately after drawing each circle, the coating may run. Hold the cake ball on its side for a few moments and allow coating to set before setting it down and moving onto the next one.
- For Rudolph’s mouth and Frosty’s eyes and smile: Repeat steps 1 and 2 in this section, using only black food coloring. Draw Rudolph’s mouth and small dots for Frosty’s eyes and smile, leaving space for the carrot nose (see photo for reference).
- For Frosty’s carrot nose: Repeat steps 1 and 2 in this section, using only orange food coloring. Gently squeeze the bag to draw a small, sideways triangle for Frosty’s carrot nose.
- Use a toothpick to add dabs of melted candy coating to the back of holly sprinkles and secure to Frosty’s hat.
- Optional: Add a bit of edible glitter onto cake balls for a glistening effect.
- Let coating harden before serving or moving cake balls to a sealed container.
- Enjoy!
Tips & Tricks
- I prefer meatball tongs to measure and pre-shape each ball, but tablespoons or a melon baller also work.
- I highly recommend a double boiler or, better yet, a candy melting pot, which makes burning the almond bark nearly impossible and cleanup especially easy.
- Almond bark coating burns easily, so go slowly, stir occasionally, and maintain a very low heat (or short bursts in the microwave). You can always heat it more, but once it burns it’s hard to recover.
- If the candy coating starts to “seize” or clump, it’s usually due to moisture or overheating. Never add cold ingredients like water or butter. Add a small amount of melted coconut oil and continue to heat slowly and stir occasionally.
- The trick to getting nice, smooth cake balls is an even coating. Right after dipping each cake ball, tap your spoon lightly against the edge of the melting pot to let excess coating run back into the melted candy coating. Take your time here—it will make a huge difference.
- Kitchen tweezers are helpful when adding sprinkles and small embellishments to cake balls.
- Test the piping bag on a plate or napkin before piping onto cake balls. If the candy coating is too thin, pop it into the fridge for a minute to thicken it up. If it gets too thick, soak the bag in some warm water to re-melt it.
- Wait until candy coating hardens, then use a paring knife to gently shave excess coating from the base of each cake ball.
- Have leftover chocolate? Pop it into a silicone ice tray or candy mold and let it reharden to save it for next time.
- For storage follow the 1-2-3 rule: 1–2 days at room temperature; Up to 2 weeks in the fridge; 3 months in the freezer.
- Oreo top hat and pretzel antlers may get soft and fall off after refrigeration, so if you make these for a gathering, take that into consideration. If you need to refrigerate, consider waiting to add Frosty’s hat by re-melting candy coating and using it as an adhesive. For Rudolph’s antlers, go ahead and add them before refrigerating and replace soft pretzels before serving. Do so gently to avoid cracking.
- Note: Oil-based food coloring doesn’t cause melted chocolate to seize.

Jennifer Garcia is an award-winning photographer, writer, mom and wife in East San Diego County who wishes you and yours the sweetest of holidays seasons. All photos are hers.