Pattern and Turtle

One way to learn about Asian American Pacific Islander (AAPI) Heritage Month is to do an art lesson and project together as a family, group of friends, class or scout group. Here we learn about tapa cloths, an important part of Pacific Islander culture, and how to make them out of brown paper bags. There is lots of room for creativity, so have fun with this art project!

What is Tapa Cloth?

Tapa cloth, typically made from the inner bark of a mulberry or fig tree, are found throughout the Pacific Islands (Hawaii, Fiji, Papua New Guinea, Samoa and more). Used for both functional and ceremonial purposes, tapa cloth is decorated with organic and geometric shapes using natural dyes made from plants. It can be painted or stamped. For large tapa cloths, artists often use a stencil under the cloth and dab ink over the template, sort of like a crayon rubbing. Tapa cloth is often made for special occasions such as weddings, given as gifts to special guests, or used as decoration. While “tapa” is the universally known term, it has different names on different islands: 

  • Samoa — siapo
  • Hawaii — kapa
  • Fiji — masi 

SUPPLIES

Brown paper grocery bag

Scissors

Iron

Ruler

Pencil

Eraser

Permanent marker

Tempera or acrylic paint in earth tones or bright colors

Paintbrush

Water cup

Paper plate 

Paper towels


DIRECTIONS

  1. Cut open a brown paper bag at the seam; Cut off the entire bottom of the bag so you have one large rectangle. 
  2. Crumple the paper into a ball, then open and smooth it out with your hands. Do this several times. It helps to add a bit of water to the paper, to soften it and make it easier to crumple. This process makes the paper look more like cloth. If you do dampen the paper, allow it to dry thoroughly before moving to the next step.
  3. Iron bag to smooth out (iron it whether you add water in the previous step or not). Cut into a standard paper size such as 8½” x 11” or 9” x 12”. 
  4. Create your design. 
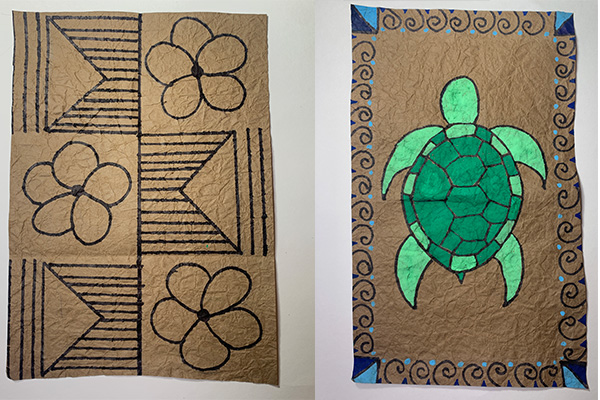
  1. For a geometric-looking tapa cloth: Using a pencil and ruler, divide the paper into six sections. Draw simple patterns using squares, triangles, circles or shapes of your choice in each square. You can also add simple lines if you’d like. 
  2. For one large picture: Draw an image in the middle of your paper such as a fish, shark, or turtle and add a decorative pattern around the edge. 
  1. Go over the pencil lines with permanent marker. 
  2. If you want your tapa cloth to be colorful, paint as desired. Traditional tapa or siapo cloth uses earth tones such as red, brown and yellow ochre.


Learn more about tapa cloths from Bowers Museum in Santa Ana, CA. 


Alyssa Navapanich is a nationally recognized art educator who teaches art to elementary school kids in East San Diego County. She is the contributor to San Diego Family Magazine’s award-winning column, “Art with Alyssa.”

_____________

Art with Alyssa: Shamrock Watercolor Banner

Art with Alyssa: Shamrock Watercolor Banner

Here’s a St. Patrick’s Day art project the whole family can get excited about! Make beautiful watercolor designs and cut them into shamrock shapes to make a decorative banner or cards for loved . . .

Read more

Art with Alyssa: How to Make a Leprechaun Trap for St. Patrick's Day

Art with Alyssa: How to Make a Leprechaun Trap for St. Patrick's Day

Have fun this St. Patrick’s Day making leprechaun traps with the kids. Start by reading a related story, such as How to Catch a Leprechaun by Adam Wallace, for inspiration. Then use imagination an . . .

Read more

Lucky Leprechauns

Lucky Leprechauns

This St. Patrick’s Day create some cute leprechauns from plastic eggs and craft scraps.SuppliesGreen plastic Easter eggsScraps of craft foam, felt or paperSmall, miscellaneous craft items (ribbon, . . .

Read more

Swirly Shamrocks

Swirly Shamrocks

Craft this cute shamrock for St. Paddy’s Day with green paper, glue and a little glitter. You'll Need:4 sheets of 8 1/2 x 11 green cardstock or construction paperPencilRulerScissorsWhite glueTr . . .

Read more

Art with Alyssa: Nature Pendants

Art with Alyssa: Nature Pendants

Spring is an excellent time for nature-inspired art projects for kids. This month’s “Art with Alyssa” project provides instructions to make nature pendants, which make wonderful gifts for . . .

Read more

Art with Alyssa: How to Make a Nature Journal

Art with Alyssa: How to Make a Nature Journal

Creating and maintaining a nature journal is a fun, relaxing and educational activity for children (and adults) that encourages time outdoors and connection with nature. There is no right way to kee . . .

Read more

Art with Alyssa: Nature Weaving

Art with Alyssa: Nature Weaving

Supplies Twigs or sticks, 6–12” long Garden clippers Scissors Twine or yarn Variety of grasses, flowers and plants with long stems. (I used buttercup, euryops, geranium, lavender, rosemar . . .

Read more

Spring Bunny Cup

Spring Bunny Cup

This spring, craft a cute bunny cup to hold Easter treats! You'll Need:Paper cupScraps of pretty paper12” length of crepe paper streamerChenille stemGlitter3 buttons3 pom-pomsWhite gluePencilMark . . .

Read more

Burlap Bunny Treat Bags

Burlap Bunny Treat Bags

These cute burlap bunnies are fun to create and fill with treats, making them perfect for friends or classmates! Kids can participate in assembling or decorating these treat filled easter decoration . . .

Read more

Easter Egg Decor

Easter Egg Decor

Decorate real eggs this Easter to look like sweet treats such as cupcakes, lollipops and wrapped candies. SuppliesEggsEgg decorating kit/dye of choiceSmall pieces of colored and clear cellophaneBake . . .

Read more

Art with Alyssa: Recycled Egg Carton Flowers

Art with Alyssa: Recycled Egg Carton Flowers

Turning trash into treasure is not only fun, it’s great for the planet. You’ll love this recycled art project that transforms a paper egg carton into a beautiful bouquet of flowers—perfect for . . .

Read more

Art with Alyssa: Recycled Easter “Eggs”

Art with Alyssa: Recycled Easter “Eggs”

Combining Easter fun and environmental awareness in honor of Earth Day is a win-win in our eyes. Here are instructions to make DIY Easter “eggs”— a fun and clever way to wrap and hide treats f . . .

Read more

Art with Alyssa: DIY Easter Treat Baskets

Art with Alyssa: DIY Easter Treat Baskets

Make miniature baskets using simple materials like paper plates, pipe cleaners and markers; then deliver springtime treats to neighbors and friends! Supplies Paper plates, one per basket Marker . . .

Read more

Art with Alyssa — Bunch of Bunnies

Art with Alyssa — Bunch of Bunnies

This cute bunny craft is a perfect springtime or Easter activity for the kids to do at home, school or with friends. You may already have some of these supplies around the house. SuppliesOne short . . .

Read more

Be Family Informed – Sign up for our Newsletters below!

Subscribe